Connecting Your AI Client to the Blindata MCP Server
Connect any MCP-compatible AI client to your Blindata tenant to explore, search, and manage your data through natural language.
MCP Server URL
Every request targets your tenant through this endpoint:
https://{your-blindata-host}/mcp-api/v1/tenant/{tenantUuid}/mcp/
| Placeholder | Description |
|---|---|
{your-blindata-host} |
Your Blindata instance URL (e.g. https://your-company.blindata.io) |
{tenantUuid} |
Your tenant identifier (UUID) — find it under Settings → Account Information in the Blindata web interface |
Connections must use HTTPS.
Authentication
All MCP requests must be authenticated. The method you use depends on your client type and how your organization manages identity.
| Method | Request headers | Best for |
|---|---|---|
| OAuth 2.0 (Blindata AS) | Discovered automatically; client sends Authorization: Bearer <token> after login |
Desktop AI clients (Cursor, VS Code, Claude) and MCP-compliant tools |
| API key | x-bd-user + x-bd-apikey |
Scripts, legacy setups, tenants without OAuth |
| Bearer token (Blindata-issued) | Authorization: Bearer <token> |
Custom clients that already hold a Blindata access token |
| External provider token (Entra ID, OIDC) | Authorization: Bearer <token> |
Enterprise custom integrations with existing IdP app registrations |
The MCP server validates every request against the Blindata API. The tenant UUID in the URL path scopes the request to your tenant.
1. OAuth 2.0 — Blindata Authorization Server (recommended)
The recommended approach for desktop AI clients. When you connect, your AI app opens a browser so you can sign in with your usual company account (Microsoft Entra ID, Google, and others). Blindata acts as the OAuth Authorization Server and federates that login — you do not put your password in the AI client.
Before that login can work, Blindata must recognize your AI app. There are three ways to set that up:
| Option | What it means in practice | Who sets it up |
|---|---|---|
| Automatic (CIMD) | The AI app identifies itself to Blindata on its own — no manual setup in Blindata. Used by Claude Desktop via Customize → Connectors. | Ask Blindata support to enable CIMD on your tenant |
| Automatic (DCR) | The AI app registers itself with Blindata when you first connect. Used by Cursor and VS Code. | Ask Blindata support to enable DCR on your tenant |
| Pre-registered client | A Blindata administrator creates a dedicated OAuth client in Settings, then gives you an OAuth Client ID to paste into the AI client. | Your tenant administrator — no support request needed |
Regardless of which option your tenant uses, the end-user experience is the same: the client opens a browser, you sign in and grant consent, and subsequent MCP requests carry an Authorization: Bearer <token> header. The client stores and refreshes that token automatically.
Blindata treats all MCP OAuth clients as public clients. Authentication uses the authorization code flow with PKCE — Blindata does not issue client secrets.
How each option works
MCP clients discover Blindata’s OAuth configuration automatically from the MCP server URL (RFC 9728 Protected Resource Metadata). The difference between the three options is how the AI client proves its identity to Blindata before the login flow starts.
Client ID Metadata Documents (CIMD)
CIMD is an OAuth client registration method defined in the MCP authorization specification. Instead of pre-creating a client record in Blindata, the AI app uses an HTTPS URL as its client_id. That URL points to a JSON document hosted by the app vendor (for example, Anthropic for Claude Desktop) containing the app’s name, redirect URIs, and other OAuth metadata.
When you click Connect, Blindata fetches that document, validates it, and proceeds with the OAuth authorization code flow with PKCE. No OAuth Client ID needs to be configured manually on either side.
Claude Desktop uses CIMD when connecting through Customize → Connectors. Anthropic’s clients select this path when Blindata’s authorization server advertises CIMD support. This is the validated setup for Claude Desktop.
Dynamic Client Registration (DCR)
DCR is the older automatic registration method. When you first connect, the AI client sends a registration request to Blindata’s registration_endpoint, creating a new OAuth client record at runtime. Blindata returns a client_id; the client then completes the browser login using PKCE. No client secret is issued.
Cursor and VS Code typically use DCR when you add the Blindata MCP server URL to their configuration. Each client instance may create its own registration, so switching machines can produce separate client records.
Pre-registered client
When automatic registration is not enabled — or when your organization prefers explicit control — a tenant administrator creates the OAuth client manually in Settings in the Blindata web interface. Blindata issues an OAuth Client ID only.
The end user enters that value in the AI client (for example, Advanced settings in Claude Desktop’s Connectors UI). Claude authenticates as a public client with PKCE — leave the Client Secret field empty. Per Claude’s connector authentication docs , the Client Secret field is optional and only needed when the authorization server requires confidential-client authentication; Blindata does not. This path does not require CIMD or DCR to be enabled on the tenant.
Tenant security settings
CIMD and DCR are tenant-level security settings. Both are disabled by default. To enable one or both, contact Blindata support — they cannot be turned on from the Blindata UI.
Note
What to ask for
| Your AI client | Ask Blindata support to enable |
|---|---|
| Claude Desktop | CIMD |
| Cursor or VS Code | DCR |
If automatic registration is not enabled on your tenant, use a pre-registered client instead. Your administrator creates it in Settings in the Blindata web interface and shares the OAuth Client ID with you.
2. API key authentication
The simplest method. Send your Blindata account credentials as request headers on every MCP call:
x-bd-user— your username or emailx-bd-apikey— your API key
API keys can be managed from the Blindata web interface. This method does not require OAuth configuration on the tenant, but credentials must be stored in your client configuration.
3. Bearer token — Blindata-issued
Send a Bearer token issued by Blindata in the Authorization header:
Authorization: Bearer <your-token>
Use this when your custom client already holds a Blindata access token — for example, one obtained through the Blindata OAuth Authorization Server flow or an existing Blindata session. The token must be valid for your tenant and not expired.
4. External identity provider token (Entra ID and OIDC)
For enterprise custom integrations, you can authenticate with an access token issued directly by your identity provider (Microsoft Entra ID, Google, or a custom OIDC provider configured on your tenant):
Authorization: Bearer <idp-access-token>
The token must include the Blindata audience — the scope or resource must target your Blindata instance (e.g. https://your-company.blindata.io/.default). The Blindata API validates the token the same way as for the main application.
Note
Entra ID vs. Blindata OAuth for MCP
Microsoft Entra ID does not support MCP Dynamic Client Registration (DCR) for arbitrary redirect URIs (cursor://, http://127.0.0.1:*, etc.). Desktop MCP clients should use Blindata OAuth (method 1), which federates Entra login on your behalf.
Custom clients that manage their own Entra or OIDC token acquisition can send a pre-obtained Bearer token directly, without going through MCP OAuth discovery. See Custom clients for Entra ID setup details.
For provider-specific configuration (SSO setup, daemon apps, token claim verification), refer to the Authentication Methods Guide .
Custom clients
If you are building your own MCP client or backend integration (not a desktop tool like Cursor or Claude), you have several authentication options:
- MCP OAuth discovery — implement the same flows as desktop clients, adhering to DCR or CIMD as described in How each option works . Your client discovers Blindata’s authorization server from the MCP URL and completes the browser or device login flow.
- Direct Bearer token — obtain an access token yourself and send it on every request, without going through MCP OAuth discovery. Common choices are a Blindata-issued token (method 3 above), an Entra ID access token (method 4 below), or another OIDC provider token configured on your tenant.
- API key — send
x-bd-userandx-bd-apikeyheaders (method 2 above).
The sections below cover Entra ID and OIDC Bearer token setup in detail. For API keys and Blindata-issued tokens, use the header patterns described in the authentication methods above.
Entra ID — user-delegated applications
For interactive applications where a user signs in through Entra ID:
- Register your application in the Entra ID portal
- Request an access token with the Blindata audience — the scope or resource must target your Blindata instance (e.g.
https://your-company.blindata.io/.default) - Include the token in every MCP request:
Authorization: Bearer <entra-access-token>
The user must exist in Blindata and be linked to their Entra identity. See SSO With Microsoft Entra ID for SSO setup and admin consent requirements.
Entra ID — daemon and service principal applications
For unattended integrations (batch jobs, internal services, custom agents), use the OAuth2 client credentials flow:
- Register a service principal in Entra ID and assign the required application permissions
- Create a corresponding Blindata credential with username format
msazure:{object_id}@{azure_tenant_id} - Obtain an access token using client credentials, requesting scope
{your-blindata-host}/.default - Send the token as a Bearer header on MCP requests
Step-by-step instructions, token claim verification, and curl examples are in Authenticating a Daemon App with a Service Principal .
Other OIDC providers
For on-premise or dedicated deployments with a custom OIDC provider, the same Bearer token pattern applies: obtain an access token from your provider with the correct Blindata audience and include it in the Authorization header. See Custom OIDC Provider
for configuration details.
Desktop AI Clients
The configuration format depends on your client. Use the section that matches your tool.
| Client | OAuth | API key | Notes |
|---|---|---|---|
| Cursor | Remote url in mcp.json |
Remote url + headers |
No extra tools required |
| Visual Studio Code | Remote url with "type": "http" |
Remote url + headers |
See VS Code MCP docs |
| Claude Desktop | Customize → Connectors UI (automatic or pre-registered) | mcp-remote bridge |
Config file does not support remote url; see below |
Cursor

- Open Settings → Tools & MCP and click Add Custom MCP
- Add the configuration below to
mcp.json
OAuth
{
  "mcpServers": {
    "blindata": {
      "url": "https://{your-blindata-host}/mcp-api/v1/tenant/{tenantUuid}/mcp/"
    }
  }
}
On first use, the server appears as Needs authentication. Click Connect to open the browser for Blindata login and consent. Cursor stores and refreshes the Bearer token automatically.
API key
{
  "mcpServers": {
    "blindata": {
      "url": "https://{your-blindata-host}/mcp-api/v1/tenant/{tenantUuid}/mcp/",
      "headers": {
        "x-bd-user": "{your-email}",
        "x-bd-apikey": "{your-api-key}"
      }
    }
  }
}
Claude Desktop
Note
Remote MCP custom connectors are available on Claude Free (one connector), Pro, Max, Team, and Enterprise plans. See Claude’s remote MCP connector guide for plan-specific steps.
Claude Desktop cannot use a remote url in claude_desktop_config.json — that file only launches local stdio processes. For remote Blindata MCP, use the Connectors UI or the mcp-remote bridge below.
OAuth — Connectors UI (recommended)
Claude connects to remote MCP servers through Customize → Connectors (individual plans) or Organization settings → Connectors (Team and Enterprise). Anthropic’s documentation covers the full flow: Get started with custom connectors using remote MCP .
- Open Customize → Connectors and click Add custom connector
- Enter the Blindata MCP server URL:
https://{your-blindata-host}/mcp-api/v1/tenant/{tenantUuid}/mcp/ - Choose how your tenant is set up (see How each option works above for background):
Automatic login (CIMD enabled) — leave Advanced settings empty. Claude Desktop identifies itself to Blindata via CIMD (see above) and opens a browser login when you click Connect. No OAuth Client ID to copy from Blindata.
Pre-registered client — if CIMD is not enabled on your tenant, your administrator creates an OAuth client in Settings in the Blindata web interface and shares the OAuth Client ID with you. In Claude Desktop, open Advanced settings, enter the OAuth Client ID, and leave Client Secret empty — Claude supports public clients with PKCE, and Anthropic documents the Client Secret field as optional unless the authorization server requires confidential-client authentication.
- Click Add, then Connect to complete the browser login and consent flow
- Enable the connector per conversation via the + button → Connectors
API key or Developer config — mcp-remote
When OAuth is not enabled on your tenant, or when you prefer the Developer config file, use the mcp-remote package as a local bridge. Requires Node.js 16+.
- Install the package globally:
npm install -g mcp-remote - Verify the installation:
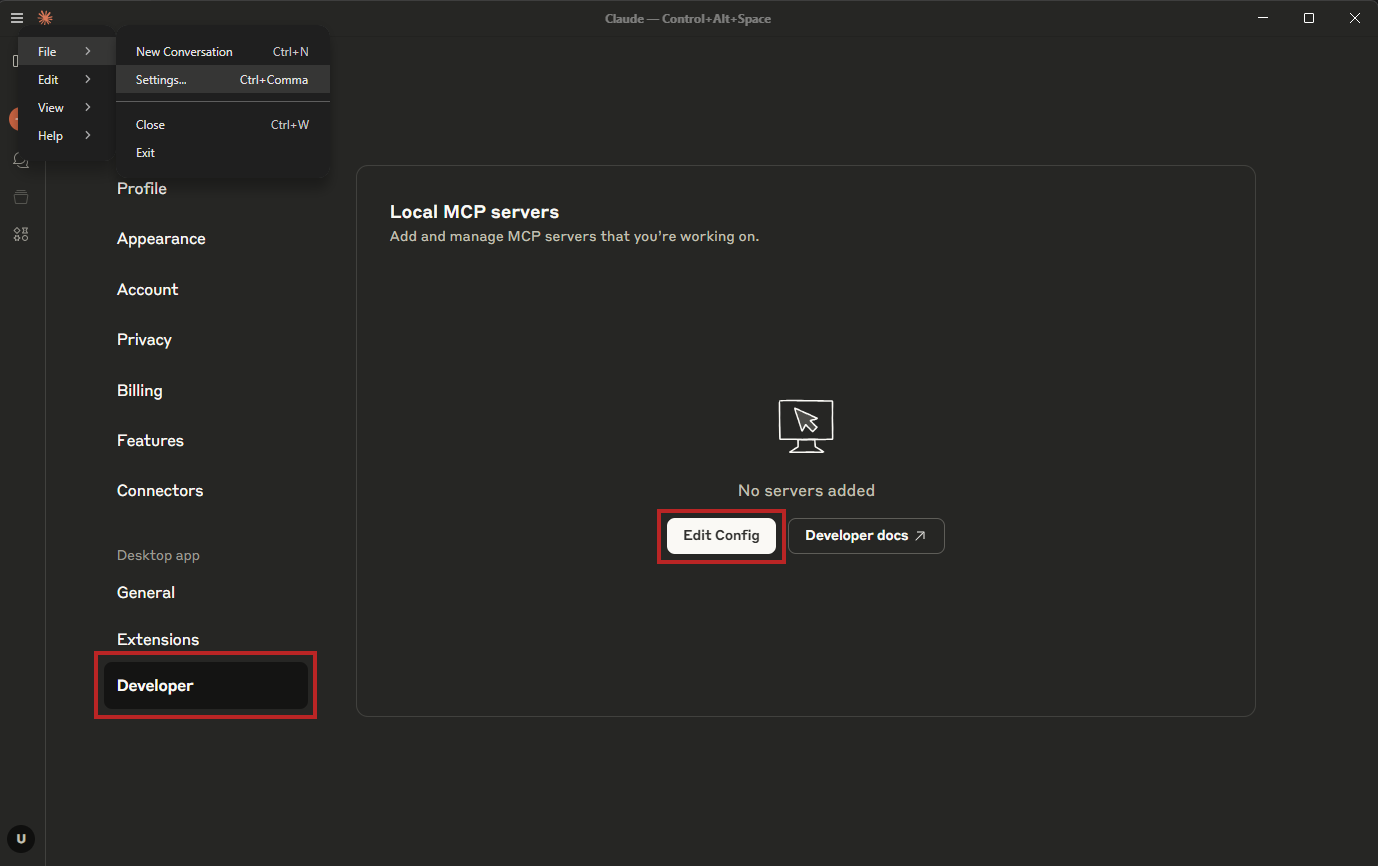
mcp-remote --version - Open Claude Desktop and navigate to Menu → File → Settings
- In the Developer section, click Edit Config — this opens your file explorer with
claude_desktop_config.json - Add one of the configurations below
- Fully quit Claude Desktop (Menu → File → Exit, or terminate the process in your Task Manager) and reopen it to reload the configuration
OAuth (automatic login enabled on tenant):
{
  "mcpServers": {
    "blindata": {
      "command": "npx",
      "args": [
        "-y",
        "mcp-remote",
        "https://{your-blindata-host}/mcp-api/v1/tenant/{tenantUuid}/mcp/"
      ]
    }
  }
}
API key (OAuth disabled on tenant):
{
  "mcpServers": {
    "blindata": {
      "command": "npx",
      "args": [
        "-y",
        "mcp-remote",
        "https://{your-blindata-host}/mcp-api/v1/tenant/{tenantUuid}/mcp/",
        "--header",
        "x-bd-apikey:{your-api-key}",
        "--header",
        "x-bd-user:{your-email}"
      ]
    }
  }
}
Note
If your API key contains a semicolon (;) or other special characters, it may cause issues with mcp-remote. This limitation is due to mcp-remote itself and its interaction with Claude Desktop. If this is the case, use quotes (’’) around your API key (without spaces) to try to fix the issue.
Visual Studio Code
OAuth
{
  "servers": {
    "blindata": {
      "url": "https://{your-blindata-host}/mcp-api/v1/tenant/{tenantUuid}/mcp/",
      "type": "http"
    }
  },
  "inputs": []
}
On first connection, VS Code opens a browser window for Blindata login and consent.
API key
{
  "servers": {
    "blindata": {
      "url": "https://{your-blindata-host}/mcp-api/v1/tenant/{tenantUuid}/mcp/",
      "type": "http",
      "headers": {
        "x-bd-user": "{your-email}",
        "x-bd-apikey": "{your-api-key}"
      }
    }
  },
  "inputs": []
}
Other AI Clients
If your client supports a remote url field, point it at the MCP server URL and follow its OAuth or header-based authentication flow. If the config only accepts command and args (stdio), use mcp-remote as a bridge — same pattern as Claude Desktop above.
Configuration files are typically located under:
- Windows:
%APPDATA% - macOS:
~/Library/Application Support/ - Linux:
~/.config/
Troubleshooting
OAuth connection fails
- Claude Desktop: confirm CIMD has been enabled (contact Blindata support), or use a pre-registered client created in Settings
- Cursor / VS Code: confirm DCR has been enabled (contact Blindata support), or use a pre-registered client created in Settings
- For Claude Desktop with a pre-registered client, verify the OAuth Client ID in Advanced settings matches the client in Blindata Settings, and that Client Secret is left empty
- Verify the MCP server URL contains the correct tenant UUID
Claude Desktop: server not connecting
- Do not put a
urlfield inclaude_desktop_config.json— use Customize → Connectors for OAuth, ormcp-remotefor the Developer config - If automatic login is not enabled, use a pre-registered client (created in Blindata Settings) via Advanced settings in Connectors, or fall back to
mcp-remotewith API key headers - The MCP server must be reachable from the public internet — Claude connects from Anthropic’s infrastructure, not your local machine
- Check Settings → Developer → Open Logs Folder for
mcp-remoteerrors
Tools not appearing
- Cursor: Save
mcp.jsonagain, or click Connect if the server shows Needs authentication - Claude Desktop: Navigate to the Developer section multiple times, or fully quit and relaunch after config changes
Custom client: Entra token rejected
- Verify the token audience targets your Blindata instance (
{your-blindata-host}/.default) - For daemon apps, confirm the Blindata user exists as
msazure:{object_id}@{azure_tenant_id}and thatoidequalssubin the token - Check that
issstarts withhttps://login.microsoftonline.com/— see the Entra daemon guide