Import Metadata from Salesforce
Salesforce
Using the Salesforce connector, it is feasible to import metadata associated with standard and custom Salesforce objects and their relationships into Blindata. Consequently, this process automatically populates Blindata Data Catalog’s metadata pertaining to Salesforce systems.
The procedure leverages Salesforce’s REST APIs.
Requirements and Setup
Salesforce Configuration
To utilize the functionalities associated with the Salesforce connector, certain configurations on the Salesforce side are necessary.
Firstly, for connecting to the Salesforce instance, an OAuth 2.0 authorization flow of the Client Credentials type is employed. Therefore, it’s essential to set up a connected app and an integration user on the Salesforce end with appropriate configurations. For more information, refer to the official Salesforce documentation .
In particular, the integration user must be assigned a license categorized as ‘Salesforce Integration,’ along with a profile designated as ‘Salesforce API Only System Integrations.’ Further details can be found here .
Lastly, since the ‘Salesforce Integration’ license provides only administrative permissions, it’s important to configure additional access permissions to standard or custom objects. You can assign the user a permission set license of the ‘Salesforce API Integration’ type, or alternatively, you can configure and assign a custom permission set that provides at least read access to all relevant standard and custom objects.
Setting Up a Connection
In order to crawl the metadata from Salesforce, a connection to a Salesforce instance must be created.
-
To add and configure a new connection, navigate to Settings → Agents → Connections → FAB button.
-
A modal window will appear, prompting the user to enter a name for the connection. Next, select the ‘SALESFORCE’ type.
-
Then the user must fill in all the remaining fields:
- Salesforce Instance URL: The specific sub-domain of the organization.
- Salesforce Client ID: The consumer key associated with the connected app set up for integration between Salesforce and Blindata.
- Salesforce Client Secret: The consumer secret linked to the connected app set up for integration between Salesforce and Blindata.
- Salesforce REST API version: The version of the Salesforce API you intend to utilize.
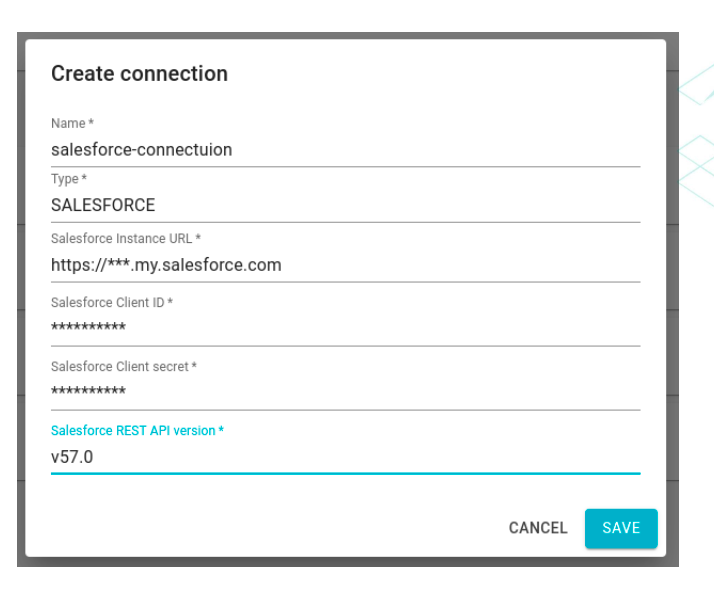
- After filling out all the fields, the user needs to press the ‘Save’ button to complete the connection creation process.
Creating a Job
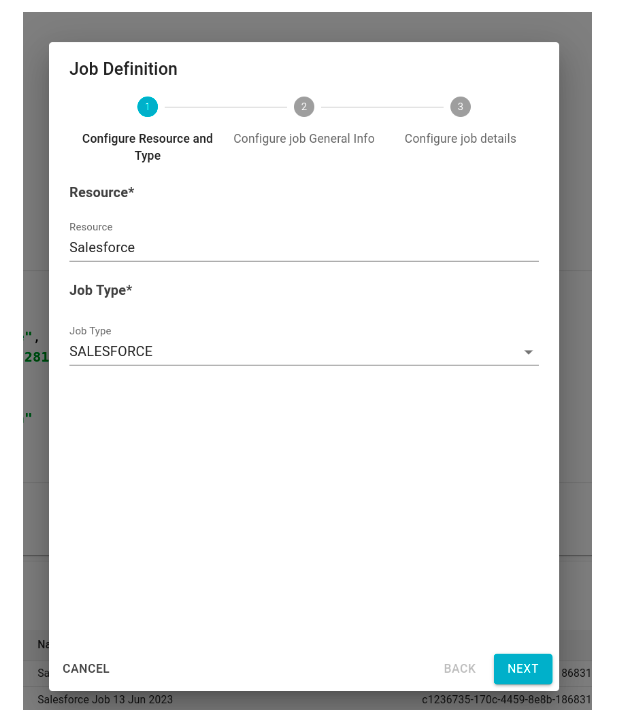
To create a crawling job on Salesforce, the user should navigate to Settings → Agents → Schedules and then click on the FAB button to open the modal for defining the job.
- In the first step, the user needs to specify the ‘Resource’ as the system where the Salesforce metadata will be loaded (this assumes that the system has been previously cataloged in Blindata) and set the job type as SALESFORCE.
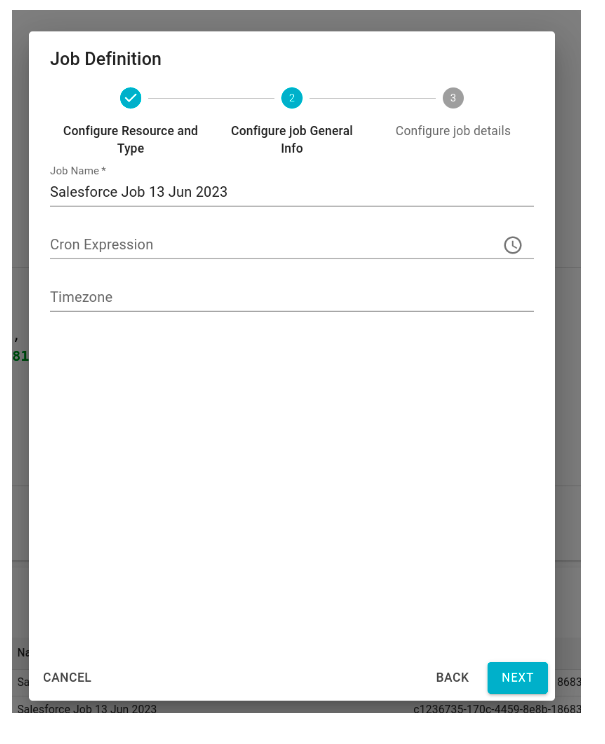
- In the second step, the user can either accept the automatically generated job name or provide a custom one. Additionally, there’s an option to set a time expression to schedule the job for periodic execution.
- Finally, in the last step, the user needs to provide the job configuration in JSON format.
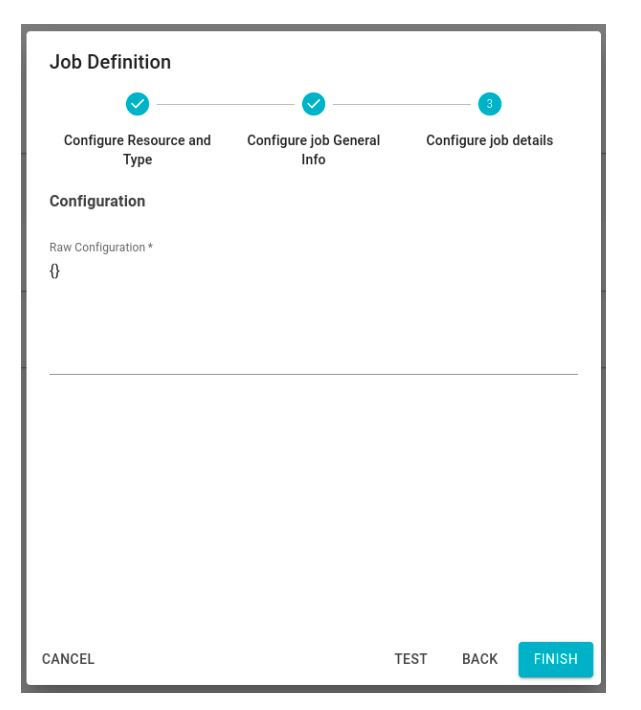
Below is the template for the JSON job configuration:
{
    "connectionName" : "",
    "salesforceSystemName": "",
    "salesforceSystemUuid": "",
    "schema": "" (optional),
    "outputOptions":{
        "dryRun": false,
        "targetConnectionName": ""
    }
}
The configuration specifies
- Connection Name: The name of the Salesforce connection as defined in the previous section (mandatory).
- SalesforceSystemName / SalesforceSystemUuid*: The name and UUID of the Blindata system where the Salesforce metadata will be loaded. At least one of these attributes must be specified.
- Schema: Schema name under which the loaded physical entities will be grouped. As Salesforce doesn’t have this concept, this field is optional.
- OutputOptions:
- DryRun: If set to true, the collected metadata won’t be loaded into Blindata. This is used for testing and debugging purposes.
- TargetConnectionName: The name of the connection to the Blindata instance. The agent will use this to load the collected Salesforce metadata. This field must be filled if the ‘dry run’ option is set to false.
Mapping of Salesforce Model to Blindata
This section outlines how the Salesforce data model is mapped onto Blindata.
-
Object → Physical Entity: A Salesforce Object (standard or custom) is mapped onto a Physical Entity.
- The name of the Physical Entity corresponds to the name of the Object.
- The type of the PE can be either BASE_TABLE or CUSTOM_TABLE.
- The description includes the ’label’ field of the Object.
- The schema is set based on the job configuration or left empty.
-
Field → Physical Field: A Field (standard or custom) is mapped onto a Physical Field.
- The name of the Physical Field matches the name of the Field.
- The description includes the ’label’ field of the Field.
- The type is equivalent to the type of the Field as in Salesforce.
-
Relationship → Physical Constraint: Any type of relationship (Master-Detail, Lookup) is mapped as a FOREIGN_KEY type Physical Constraint.
The primary key relationship is identified by analyzing the result of the ‘Describe’ call to the Salesforce REST API. For each returned Field, if the ’lookupId’ field is true, then it is considered as PRIMARY_KEY.
- The name of the constraint is derived from the name of the field identified as the primary key or from the name of the relationship (in the case of foreign keys).
- The type will be PRIMARY_KEY or FOREIGN_KEY.
- In the case of foreign keys, the target and reference Physical Entities and Physical Fields are extracted accordingly. Referring to the result of the ‘Describe’ call to the Salesforce REST API:
- The target PE is the one for which the ‘Describe’ API was called, and the target PF is its primary key.
- To calculate the referenced fields, the ‘childRelationship’ array is analyzed: for each relationship present in the array, the referenced PE is identified by the ‘childSObject’ field, while the referenced PF is identified by the ‘field’ field.