Instantiate a Blueprint
Overview
Instantiating a Blueprint in Blindata means creating a new data product from a predefined template.
At a high level, this process takes a reusable Blueprint and turns it into a real, fully configured data product by combining:
- The template logic defined by platform engineers
- The input values provided by the user
- The target environment where the data product will live (Git repositories, infrastructure, etc.)
The result is a ready-to-use data product that follows your organization’s standards for structure, infrastructure, and governance.
Conceptually, instantiation is the moment where a Blueprint moves from being a design artifact to a concrete implementation.
During this process:
- A data product is registered or linked in the catalog
- Template files are rendered with actual values
- A new repository (or set of repositories) is created and populated
- Governance and structural conventions are applied automatically
Instantiation is what enables self-service data product creation.
Instantiation is driven by the Create Data Product wizard, opened from the CREATE DATA PRODUCT button on the blueprint detail page. The wizard always runs against a specific blueprint version: make sure the correct version is selected in the detail page before starting.
Info
Current availability. At the moment, only the monorepo instantiation strategy without composition is available and supported: the wizard instantiates a single blueprint into a single target Git repository, producing one data product per run. Polyrepo instantiation and blueprint composition (parent blueprints referencing other blueprints as modules) are planned for a future release - any reference to these flows in the documentation is provided only as a forward-looking description.
The wizard has three steps:
- Pick Data Product - choose or create the data product that will be linked to the blueprint output.
- Configure Target Repositories - pick or create the repository and configure the Git secrets used by the Blueprint service.
- Insert Blueprint Parameters - fill the dynamic form generated from the blueprint manifest.
Step 1 - Pick Data Product
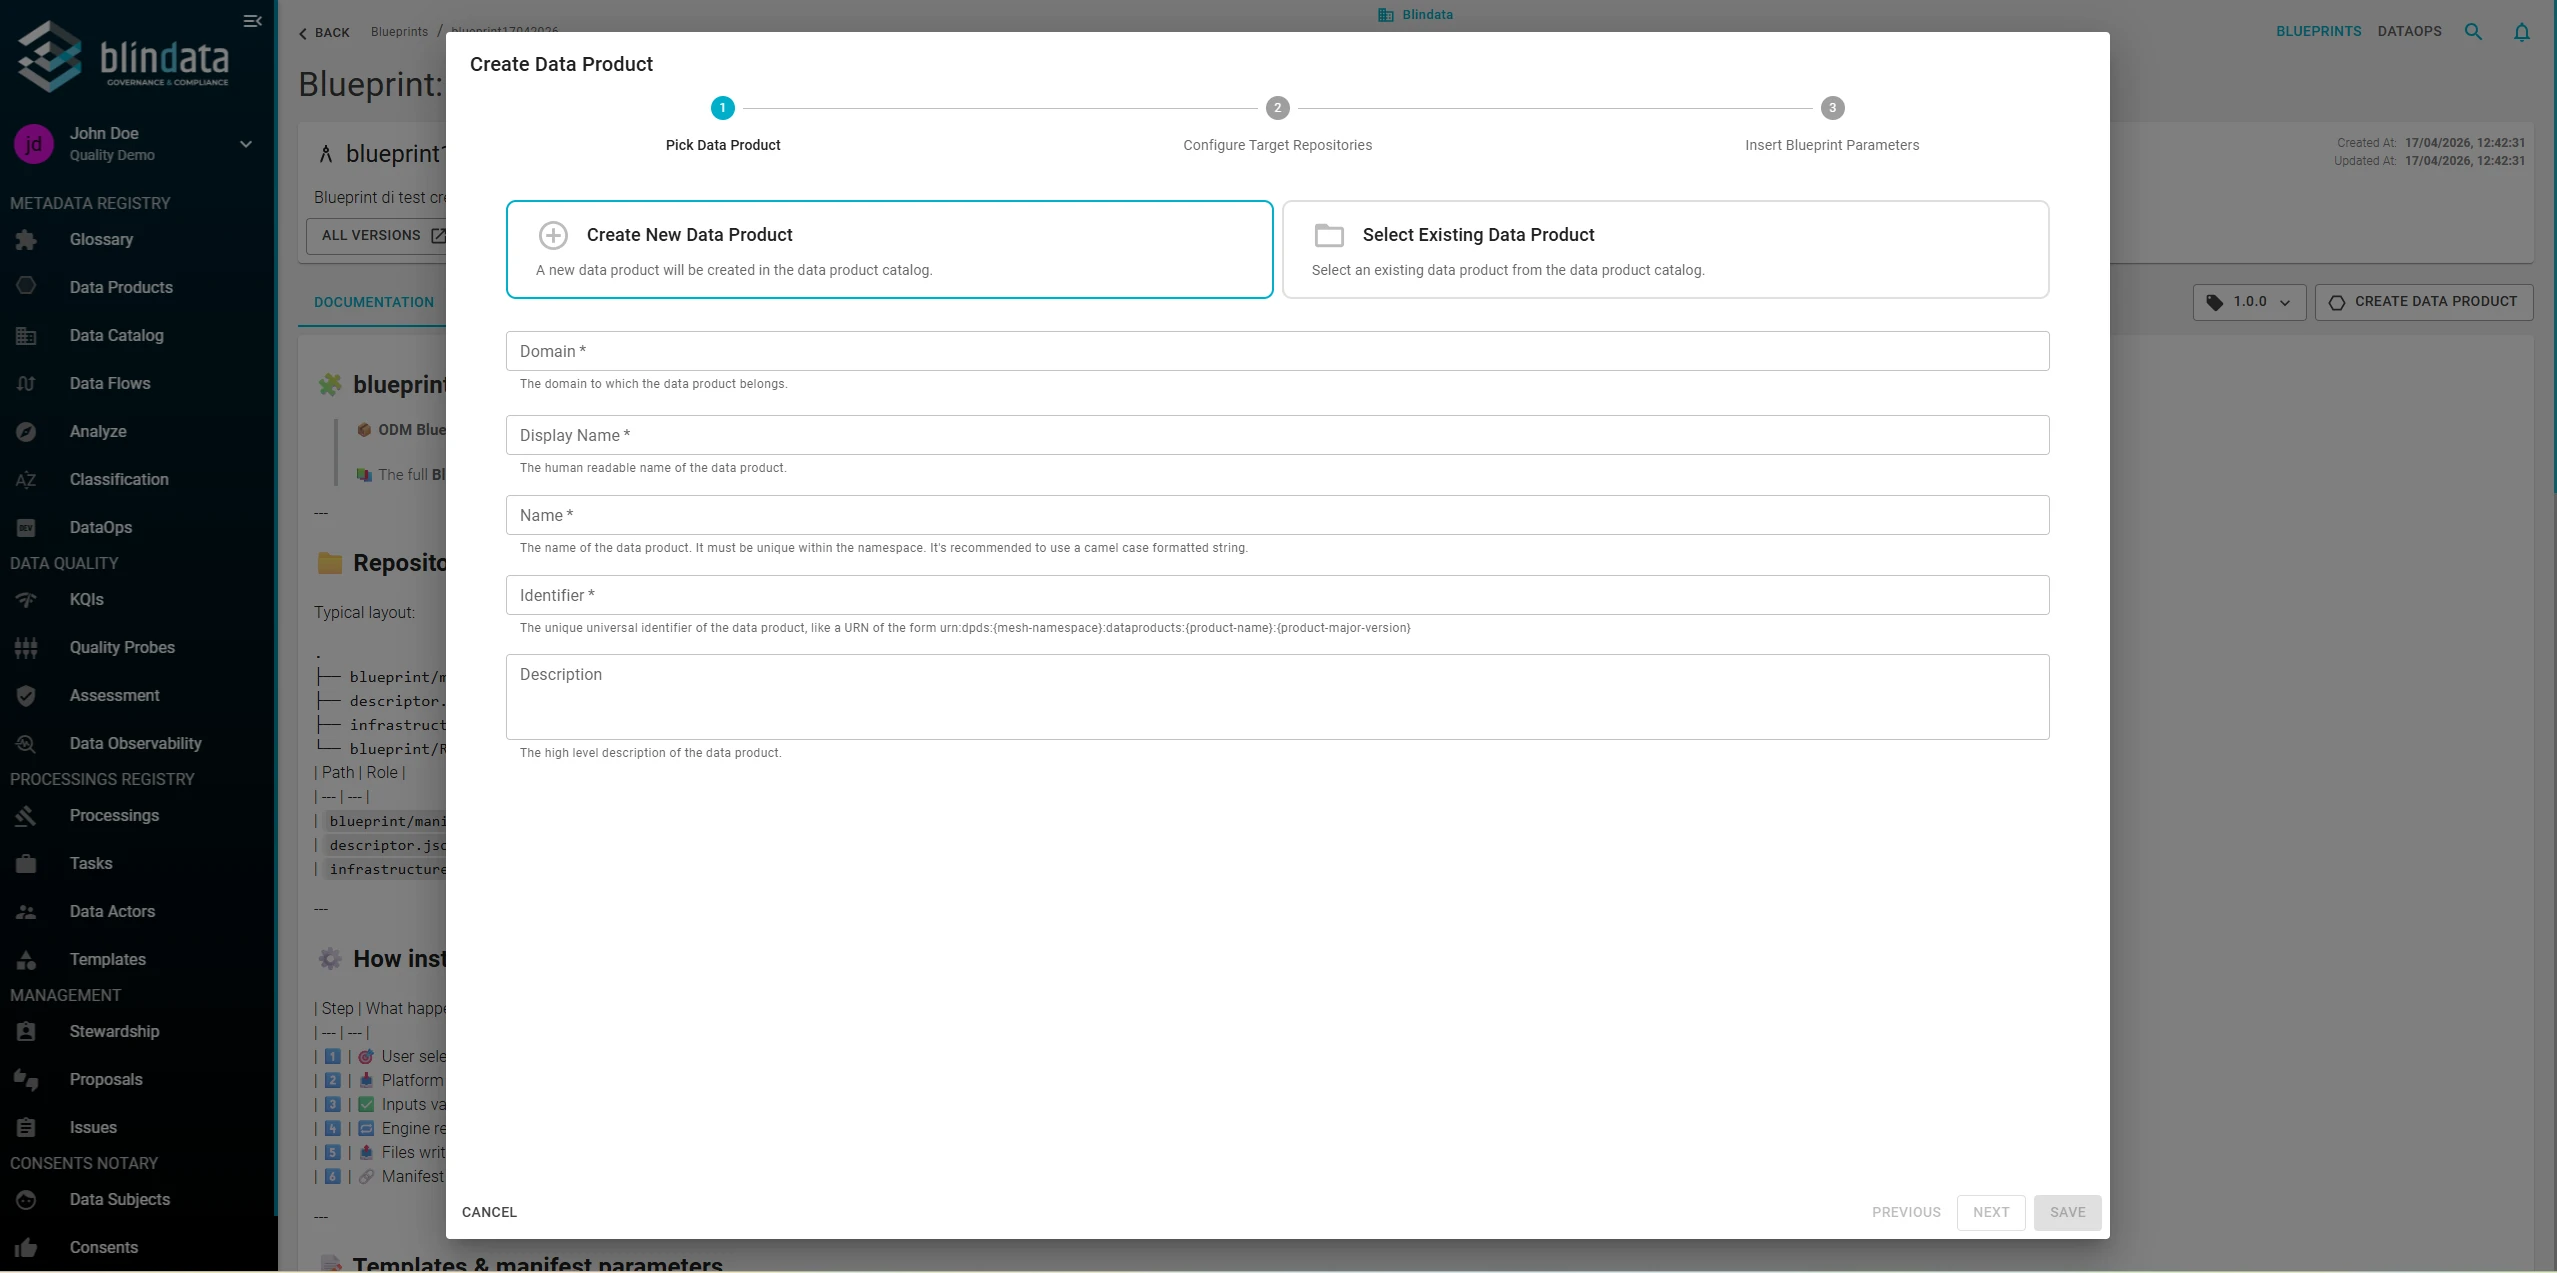
Choose between Create New Data Product (default) and Select Existing Data Product.
Create New Data Product - Blindata creates a draft entry in the data product catalog using the values below.
| Field | Description |
|---|---|
| Domain (required) | Business domain the data product belongs to. |
| Display Name (required) | Human-readable name of the data product. |
| Name (required) | Technical name. It must be unique in the namespace; camelCase is recommended. |
| Identifier (required) | Universal unique identifier / URN, typically of the form urn:dpds:{mesh-namespace}:dataproducts:{product-name}:{product-major-version}. |
| Description | High-level description of the data product. |
Select Existing Data Product - Pick a data product from the catalog. Use this option to re-instantiate or re-wire an existing data product; Blindata will keep its identity and link the blueprint output to it.
Step 2 - Configure Target Repositories
The second step consint in 3 different phases:
- Configure or select git secrets used by the Blueprint service
- Configure target repository on which the Data Product will be instantiated
- Configure (optional) advanced settings
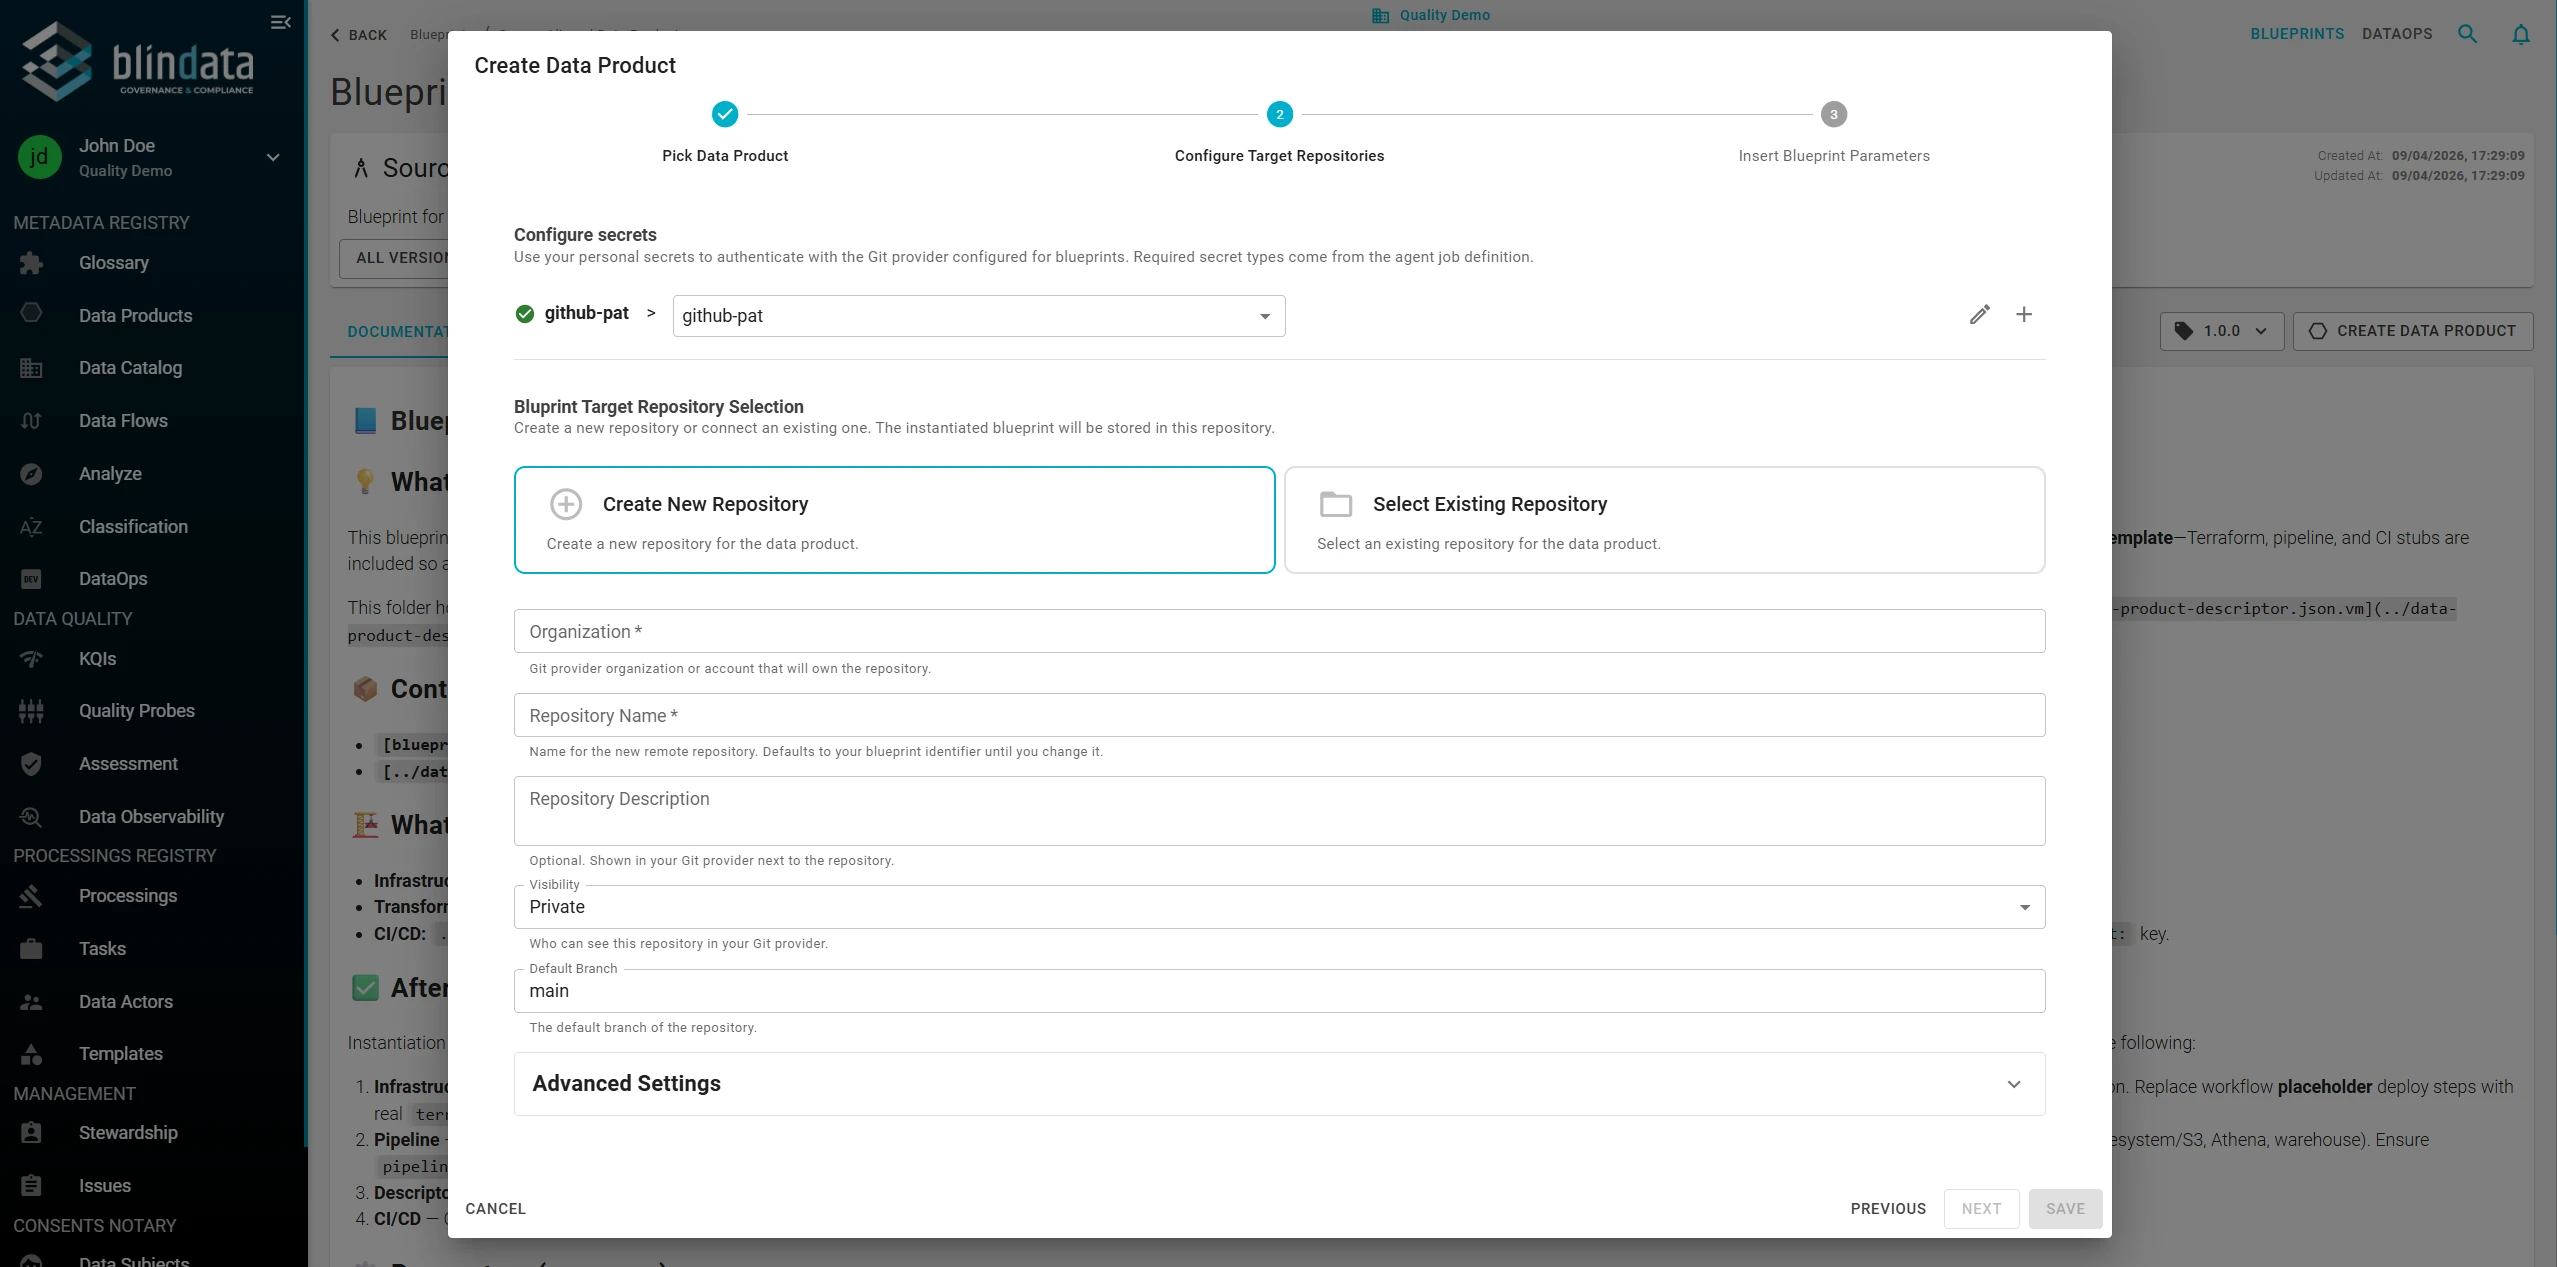
The wizard lists one row per secret type required by the Blueprint service, based on the Git provider configured for blueprints (e.g. github-pat). Pick one of your personal secrets for each row - use the + button to create a new one or the pencil icon to edit an existing one.
Then the user can choose where the instantiated blueprint will be stored (the data product repository).
Create new target repository - Blindata provisions the repository on your Git provider and pushes the generated content there.
| Field | Description |
|---|---|
| Organization (required) | Git provider organization or account that will own the repository. |
| Repository Name (required) | Name of the target repository. Defaults to the blueprint identifier; change it to match your naming convention. |
| Repository Description | Optional. Shown in your Git provider next to the repository. |
| Visibility | Repository visibility (e.g. Private, Public). |
| Default Branch | Default branch of the newly created repository (typically main). |
Select Existing Repository - Point Blindata to a repository that already exists on your provider. Useful when the repository is provisioned by another automation or must respect strict naming or permissions policies.
Behavior on a non-empty target repository
When you point the wizard at an existing repository that already contains files, Blindata does not fail and does not wipe the repository. The instantiation proceeds with a simple file-by-file overwrite on the selected target branch:
- Files whose path matches something produced by the blueprint are overwritten silently.
- Files and directories that exist in the target but are not part of the blueprint output are left untouched (they are not deleted).
- No merge, diff, or conflict resolution is performed: the blueprint output always wins on path collisions.
- All changes are then staged (
addAll), committed, and pushed to the target branch with a non-force push. If the remote branch has advanced in the meantime (non fast-forward), the push fails and the error is surfaced by the wizard.
The protectedResources concept declared in the blueprint manifest is not evaluated at instantiation time - it is designed for future update flows, not to shield pre-existing files in the target repository during this step. If you need stricter semantics (e.g. refuse to instantiate on a non-empty repository, or preserve specific files), plan to push the instantiation to a dedicated Target Branch via the advanced settings and review the result through a pull request before merging.
Advanced settings are optional; defaults are safe for standard setups.
| Field | Description |
|---|---|
| Target Branch | Branch used to push the instantiated blueprint. If empty, Blindata pushes to the repository’s default branch. Useful for review-via-PR workflows. |
Step 3 - Insert Blueprint Parameters
The last step renders a dynamic form built from the blueprint manifest: one control per parameter, grouped by the ui.group declared in the manifest. Required parameters are marked with *; validation rules (pattern, min/max, allowed values, etc.) are enforced client-side before the wizard can be submitted.
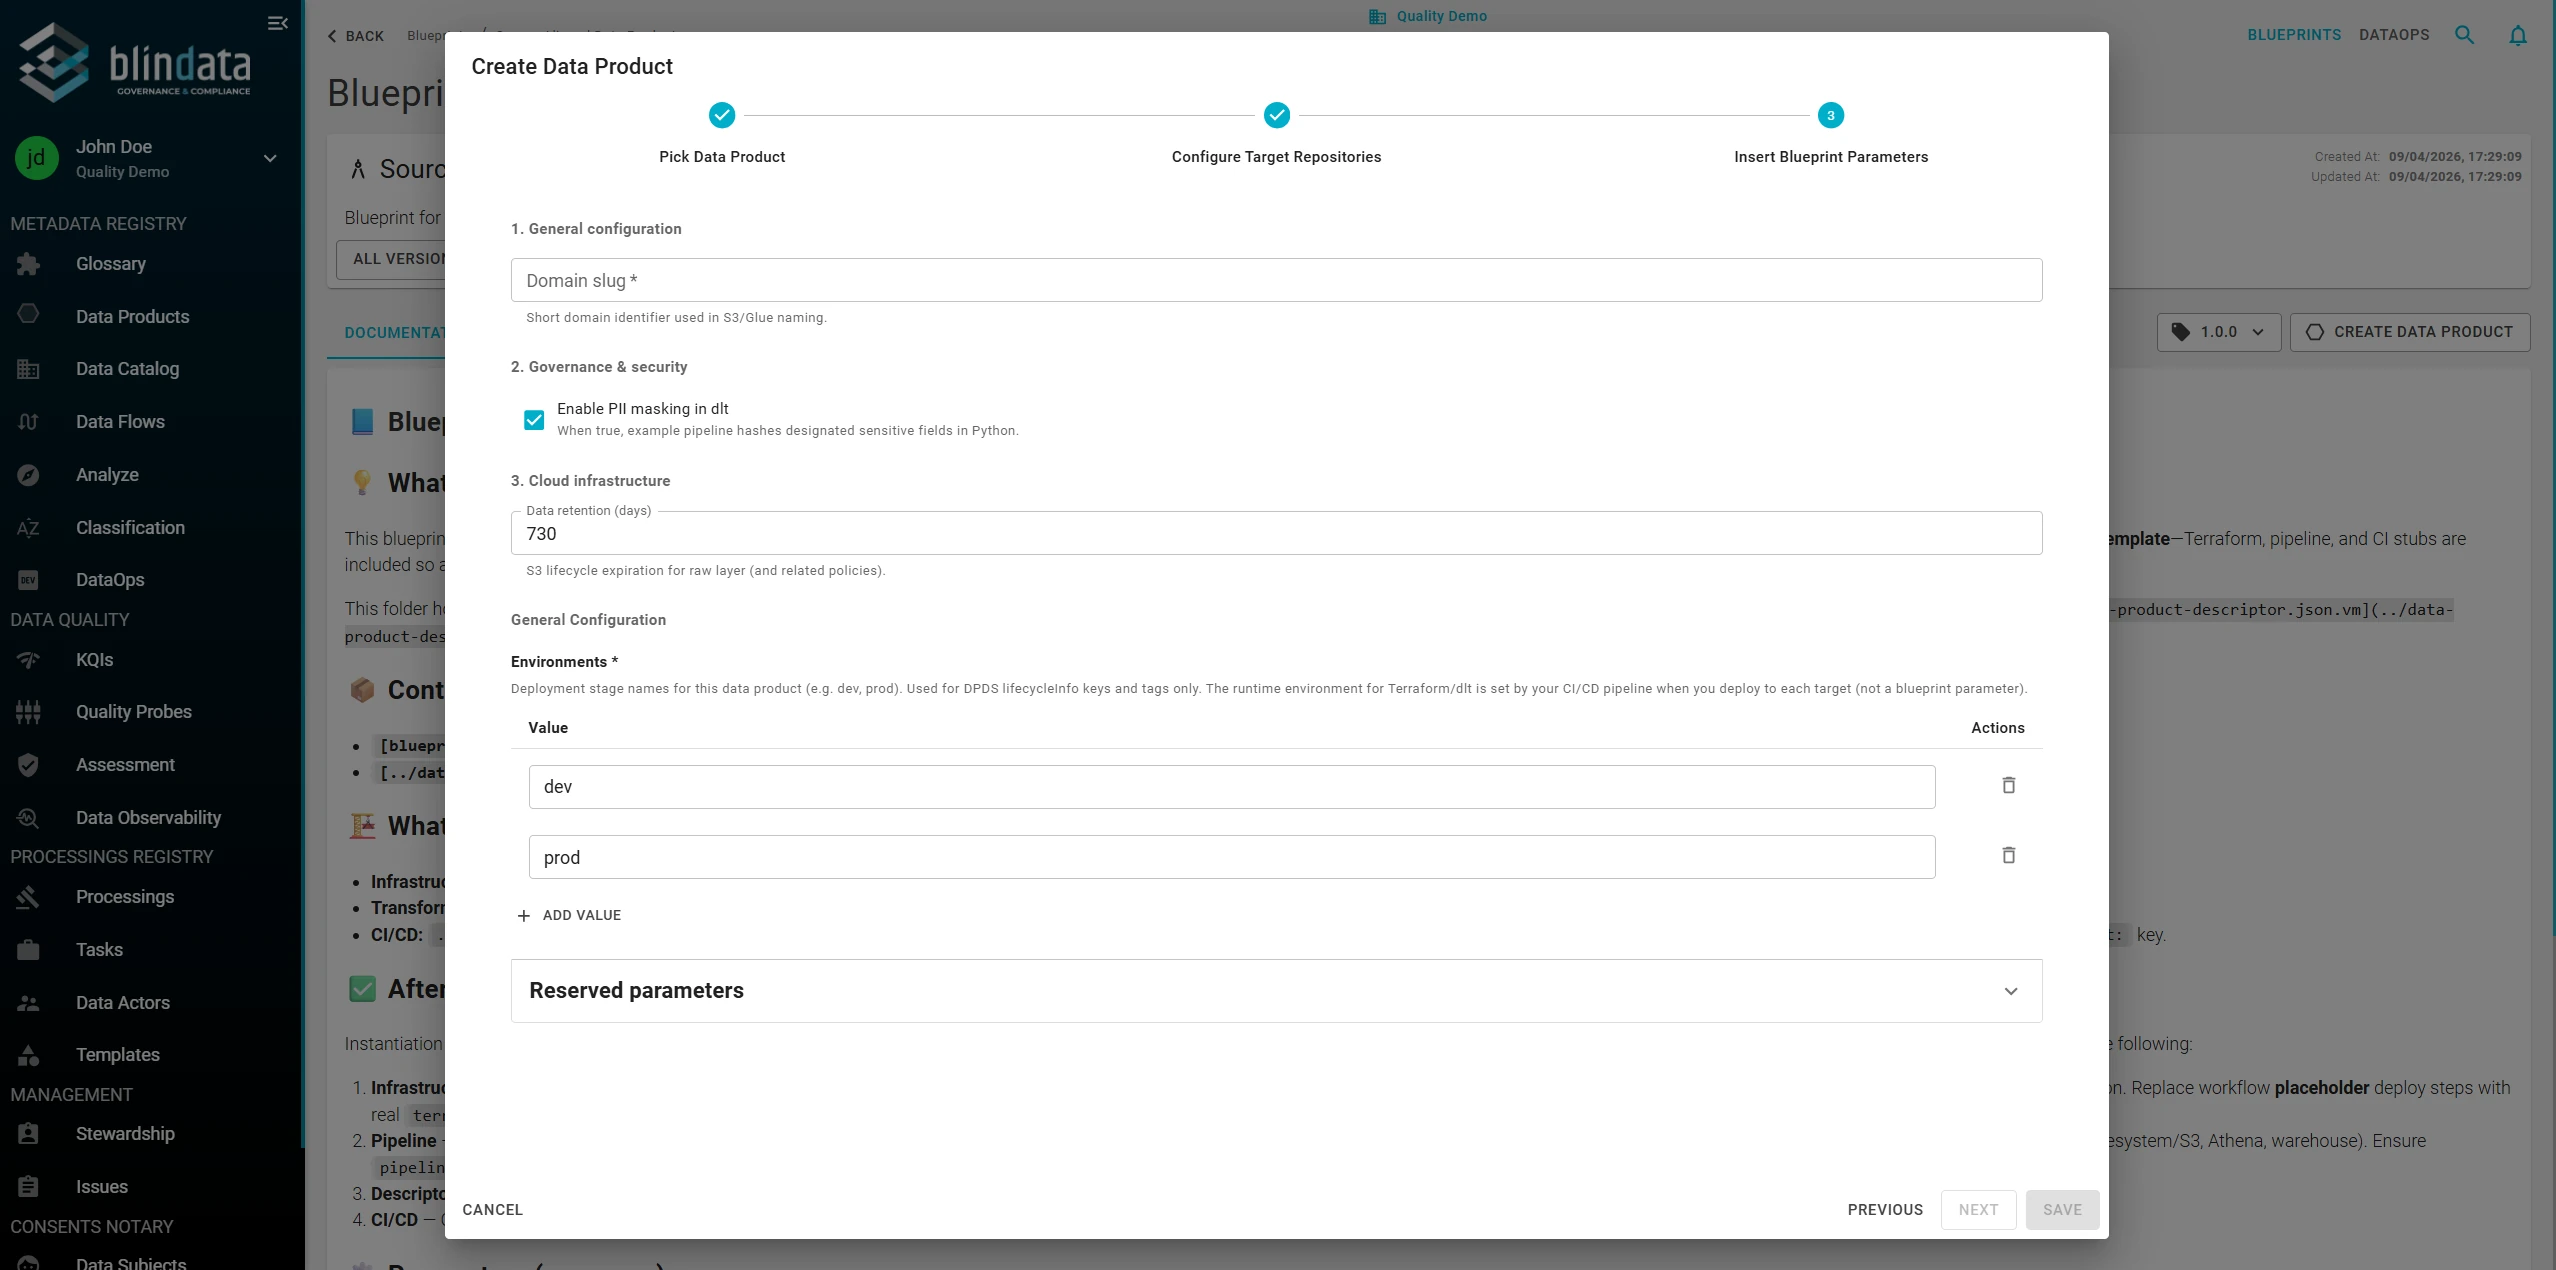
Each section in the form corresponds to a group path in the manifest. Ungrouped parameters are rendered after all grouped sections. Every control is chosen according to the parameter type, validation, and ui.formType:
- Dropdowns for
allowedValues. - Number inputs for integers.
- Checkboxes or switches for booleans.
- Row-based editors for
stringListarrays, structured editors forjsonobjects and arrays.
Controls that do not match the declared type or validation are either rejected or fall back to a default widget. See the UI metadata reference
for the full table.
Reserved parameter
At the bottom of the form Blindata renders a Reserved parameters section containing keys that are automatically bound from the data product metadata and the current user profile.
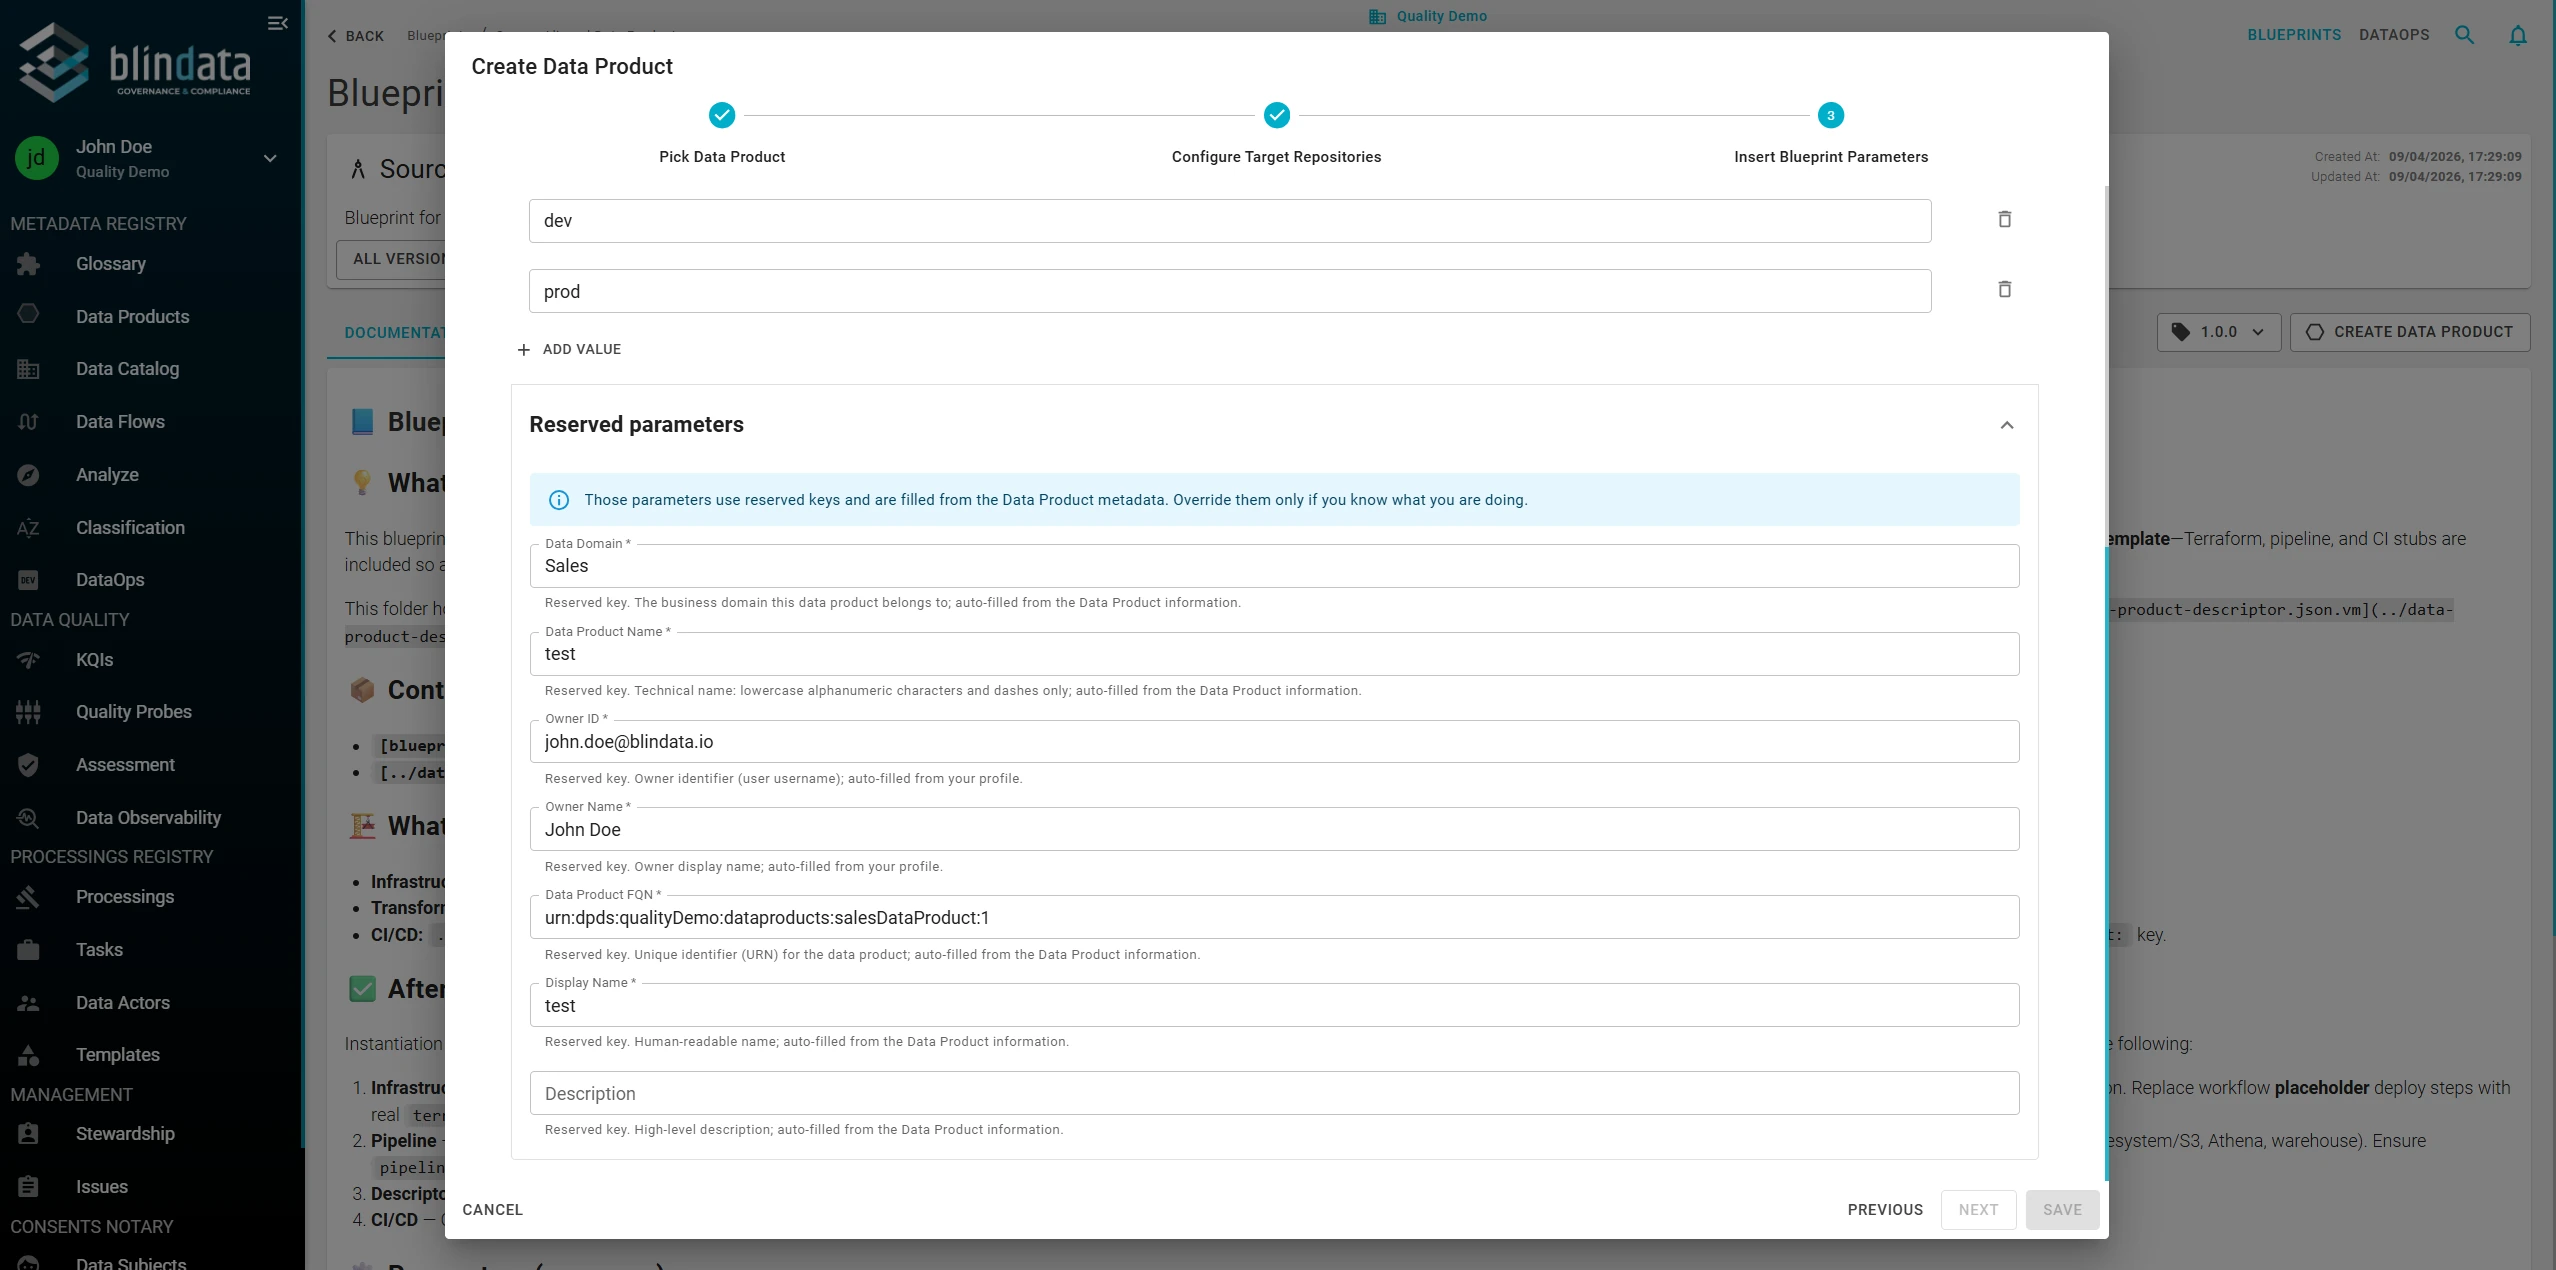
| Reserved key | Source | Purpose |
|---|---|---|
| Data Domain | Data product metadata | Business domain the data product belongs to. |
| Data Product Name | Data product metadata | Technical name (lowercase alphanumeric and dashes). |
| Data Product FQN | Data product metadata | Unique identifier / URN. |
| Display Name | Data product metadata | Human-readable display name. |
| Description | Data product metadata | High-level description. |
| Owner ID | User profile | Owner username / user identifier. |
| Owner Name | User profile | Owner display name. |
Reserved values are pre-populated and should normally be left untouched: they keep the blueprint output consistent with the catalog. Override them only if you know exactly why, for example to align an historical naming convention.
Step 4 - Instantiation
Press SAVE on step 3 to launch the instantiation. Before any remote action is executed, Blindata performs a client-side validation of the submission: every manifest parameter is checked against its declared rules (type, pattern, min/max, allowedValues, required flag), and the configured Git provider, provider base URL, blueprint name, blueprint version, and data product identifier (FQN) must all be present.
Once validation passes, Blindata opens a Provisioning panel that tracks the four stages of the end-to-end flow and makes the current state fully transparent: at any point you can see which resources have already been created and which are still pending. If a stage fails, the flow pauses on that stage - successfully completed stages are preserved, no work is rolled back, and you can return to the wizard, adjust your choices, and resume the flow from where it stopped to apply the corrective changes without re-running the steps that already succeeded.

-
Pick data product: Blindata searches the data product catalog by identifier (FQN):
- If a match is found, the existing catalog entry is reused.
- If no match is found (e.g. when you chose Create New Data Product), Blindata creates a new draft entry with the
name,displayName,description,identifier,domain, and an initialversionof1.0.0.
-
Repository Provisioning: For the
roottarget repository selected in step 2 of the wizard:- If you picked Create New Repository, Blindata calls the Git provider to create the repository with the configured organization/owner, name, description, and visibility.
- If you picked Select Existing Repository, the existing repository is used as-is.
-
Data Platform Alignment: Blindata searches the the Data Product in the platform by FQN:
- If the data product is not yet registered, it is initialized in the platform
- If the data product already exists in the platform, the repository configuration is not overwritten: a warning is surfaced and you are expected to update the repository configuration manually from the Data Product Builder .
-
Instantiation: Blindata builds the final parameter:
- Collects the manifest parameters declared by the selected blueprint version.
- Computes the reserved / auto-filled parameters from the data product metadata and the current user profile (see Reserved Parameters).
- Merges them with the values you submitted in step 3 of the wizard, giving precedence to your explicit overrides.
- The Blueprint service renders every template in the blueprint against the final parameter values, commits and pushes the generated content to the target repository on the configured branch, and writes a copy of the resolved manifest inside the data product repository to preserve lineage back to the source blueprint and version.
Once the wizard completes, the newly created data product appears in the Data Products catalog. Open the Data Product Builder to start editing the descriptor, and refer to Publish a Data Product Release Version when the product is ready for its first governed release.