Edit a Data Product Descriptor
About the descriptor
The descriptor is the JSON document (DPDS) stored in the data product’s Git repository. It is the single source of truth for the product’s identity, ownership, domain, interface components (ports), contracts, and governance metadata. Everything you define in the editor—from general metadata to port schemas and lifecycle configuration—is persisted in this file and versioned in Git.
Blindata follows the Data Product Descriptor Specification (DPDS) . The descriptor is organized into three parts:
- General info — Name, version, description, owner, contact points. What the data product is and who owns it.
- Ports — Interface components (e.g. output ports): schemas, tables, physical fields, APIs. The contract you expose to consumers.
- Lifecycle (DevOps) — Activities and tasks for building, testing, and deploying across stages (e.g. dev, test, prod).
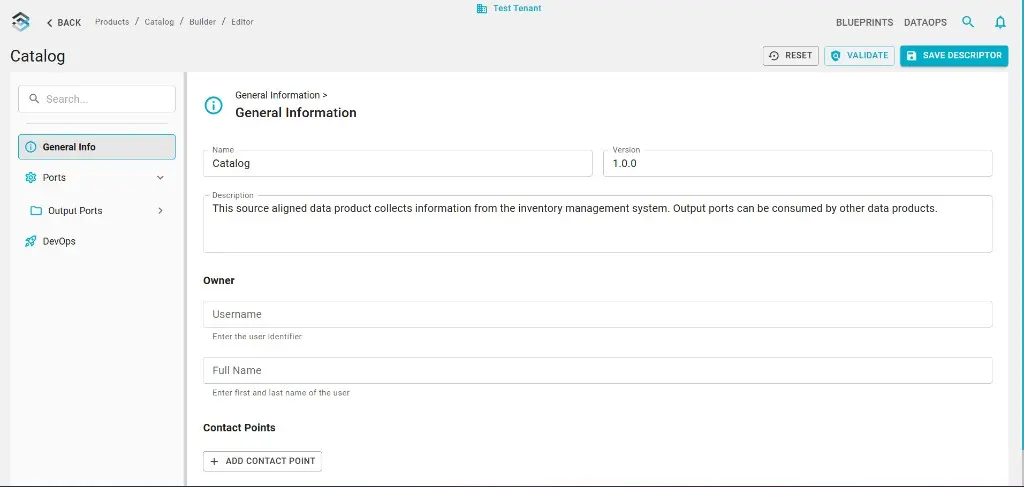
The Builder editor
The Builder editor is where you edit the descriptor in Blindata. Open a data product from the Data Product Catalog , click Builder (top right), then EDIT. The left navigation lists the sections (General Info, Ports, DevOps); the main area shows the fields for the selected section. Edit the content, run policy validation if needed, and save—changes are committed to the linked Git repository. You can save with or without passing validation; failures will surface later (e.g. when publishing).
General working and navigation
You can reach the descriptor in two ways: from the Data Product Catalog (open a product → Builder → EDIT), or from the sidebar (Data Ops → list of registered products → select one → Builder).
Toolbar: branch and version info
At the top of the Builder you see a toolbar with version-control information for the linked Git repository: the current branch (e.g. main) with a dropdown, the number of Branches and Tags, the latest Commit message, and the Author of that commit. Of these, only the branch can be changed: use the branch dropdown to switch to another branch. To edit the descriptor content for that branch, click the EDIT button on the right; the editor opens with the descriptor loaded from the selected branch. Creating and publishing release versions (tagging, changelog) is done from the Builder release flow; see Publish a Data Product Release Version
.
The data product is linked to a Git repository that holds the descriptor. When you click SAVE DESCRIPTOR in the editor, Blindata commits and pushes to the current branch. Clear commit messages (e.g. conventional commits) help build meaningful release notes. To connect or change the repo, see Data Product Initialization .
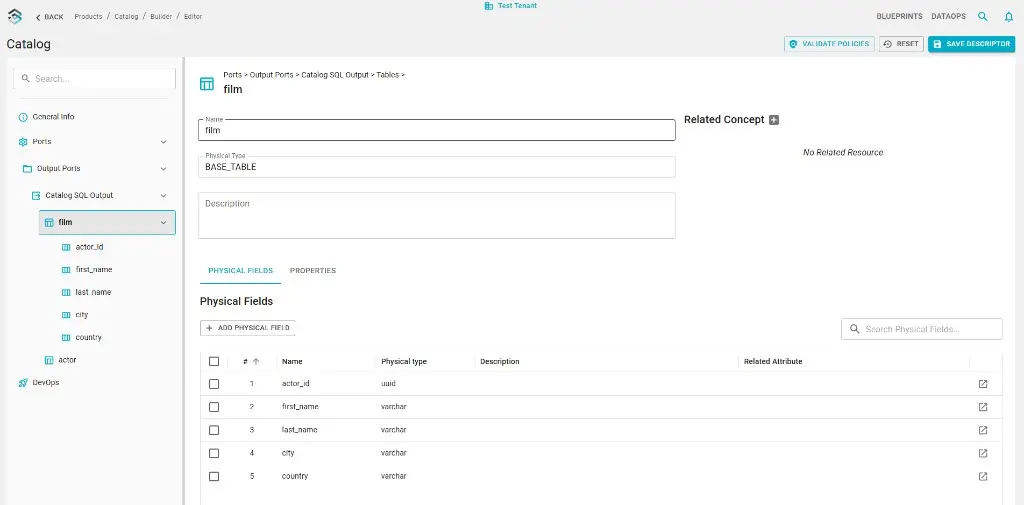
How to edit schemas
Port schemas define the structure of the data exposed by the data product: tables, physical fields, types, and related metadata. You can edit them in four ways: manual in the editor, from the catalog, from CSV import, or via external crawling. After defining physical fields, you can link them to business concepts for semantic linking .
Manual from the editor
In the Builder editor, open Ports in the left navigation, then the relevant output port and entity (e.g. a table). Add or edit physical fields, types, and descriptions with + ADD PHYSICAL FIELD. This is the most direct way to shape the descriptor’s port section by hand.
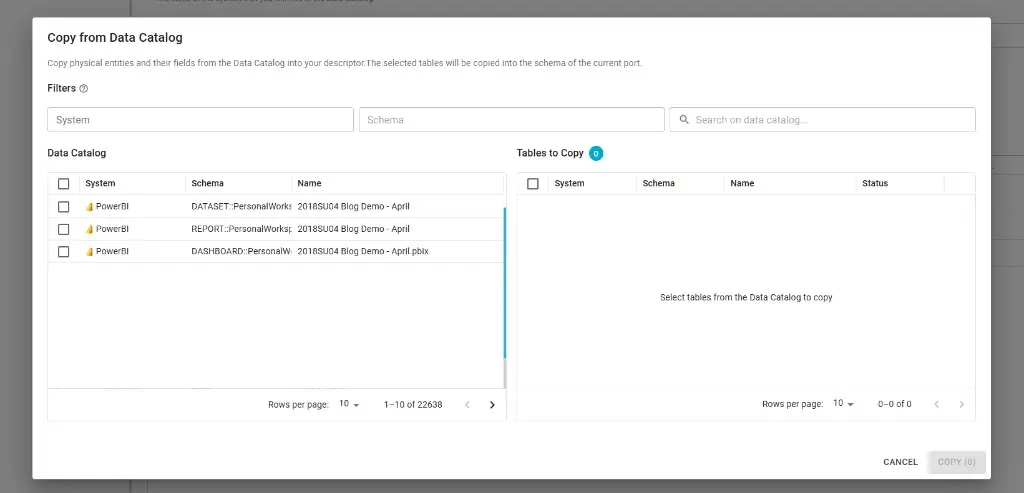
From the catalog
Schema information can be brought in from the Blindata catalog. At the moment, only output ports are supported for this flow: you select existing catalog resources to populate port definitions. Use Copy from Data Catalog to copy physical entities and their fields from the catalog into the schema of the current port; you can filter by system and schema and pick the tables to copy.
With external crawling
If metadata is collected by an external crawler or agent (e.g. JDBC, Salesforce), the discovered schemas can be used to feed or align the descriptor’s port definitions. Configure the agent and its outputs so they can be referenced or synced into the data product.
Info
Coming soon. This flow will be available in a future release.
With import of CSV files
In the Builder, use Upload from CSV to add or update many tables or columns in an output port schema in one pass. Each row is validated against Blindata (catalog rules, namespaces, semantic links where applicable). You review a summary before anything is applied; use SAVE DESCRIPTOR afterward to commit to Git.
- Open the data product in the Builder and go to Ports.
- Select the output port, open its Tables view, and click Upload from CSV.
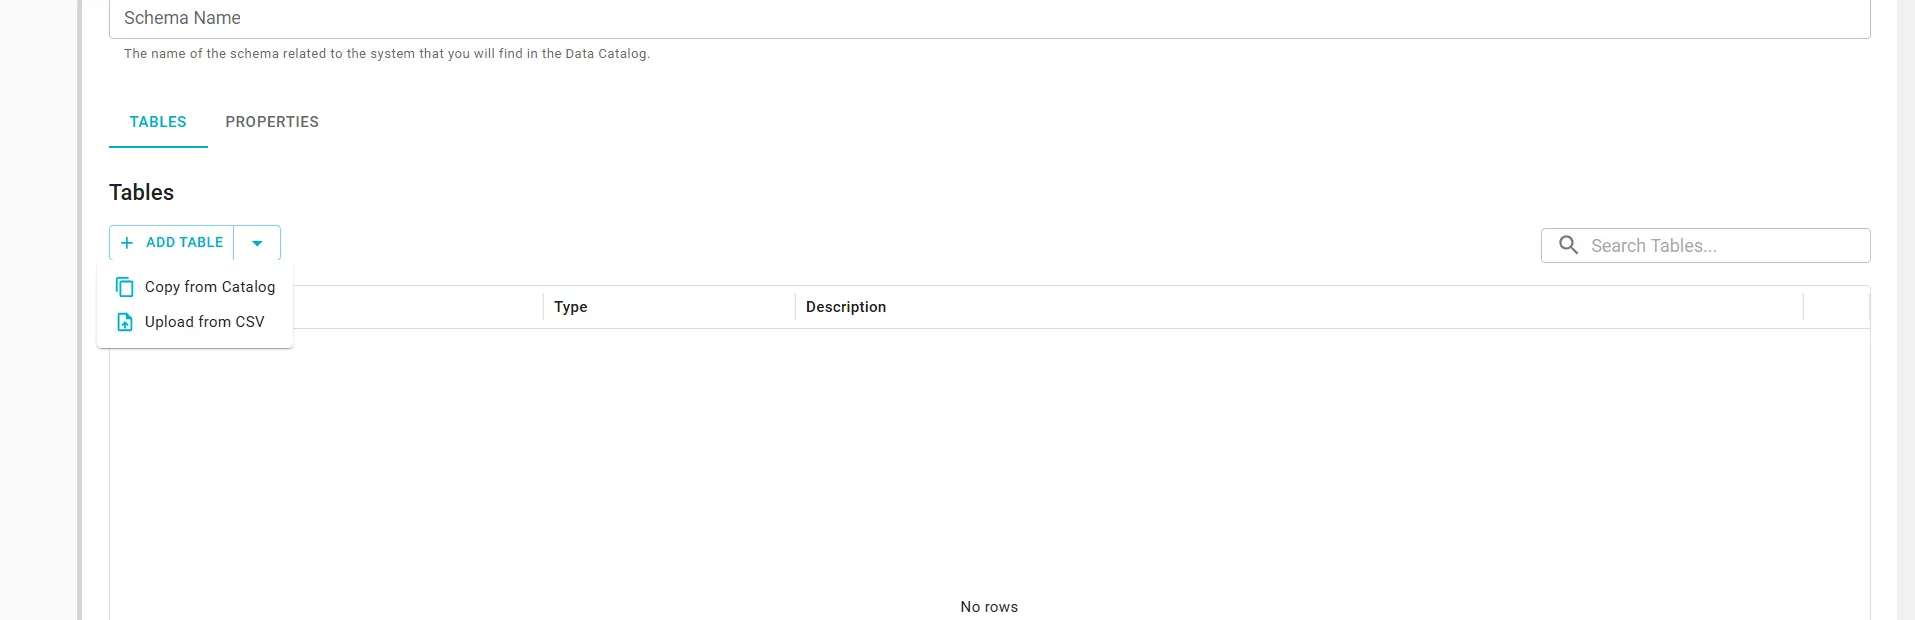
The Upload from CSV wizard has three steps: Import type, Upload CSV, and Summary.
Step 1 — Import type
Pick the kind of metadata to import:
- Upload Tables — Add or update physical entities (tables). CSV columns map to
physicalEntity.*in the descriptor. Rows for tables already in the port are treated as updates (overwrite). - Upload Columns — Add or update physical fields (columns). CSV columns map to
physicalField.*. Every row must reference a table that already exists in the descriptor; this mode does not create new tables.

Info
Column import requires existing tables. Create tables first (manually, via Copy from Data Catalog, or with Upload Tables), then run Upload Columns.
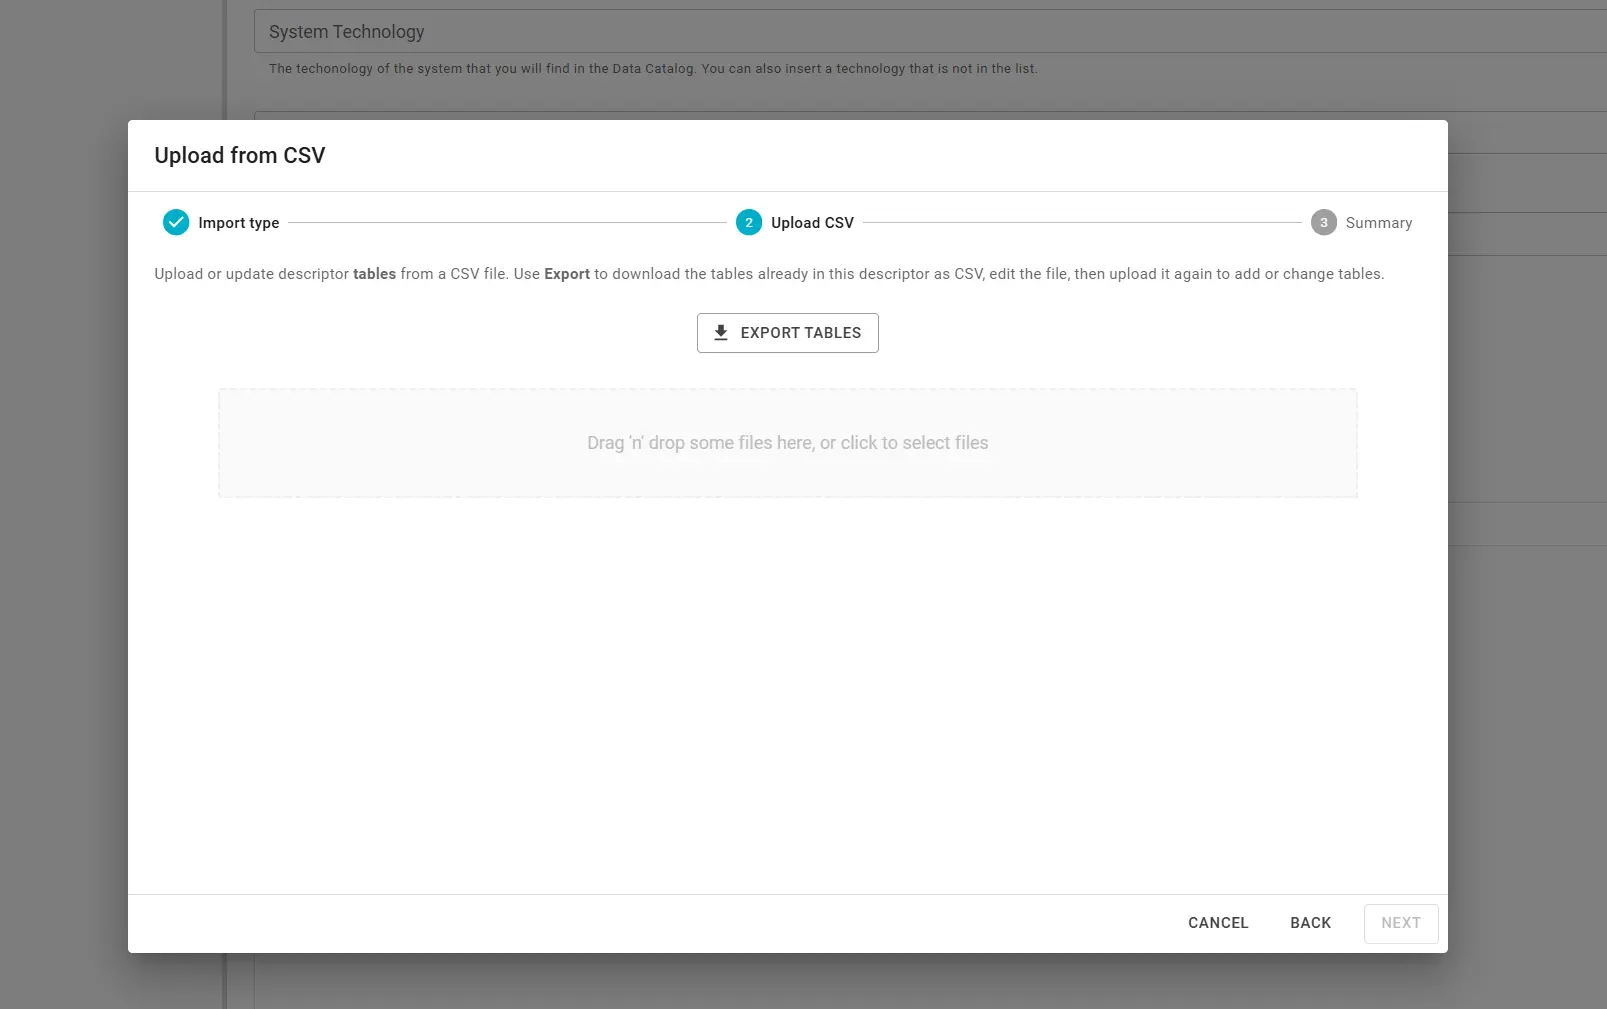
Step 2 — Upload CSV
A practical workflow is to export, edit, and re-upload:
- Click Export Tables or Export Columns (matching your import type) to download a semicolon-separated CSV from the current descriptor.
- Edit the file and upload it in the drop zone.
File requirements:
- Format — CSV with a header row; fields separated by
;(not comma). UTF-8 encoding; a leading BOM is accepted. - Size — Up to 5 MB per upload. Validation typically allows on the order of 1000 table rows or 10000 column rows per file (exact caps are shown in the UI).
After upload, CSV Preview lists the parsed rows. Fix any parse errors, then click Next. Blindata runs server-side validation (Validating rows against Blindata…) before you can continue.
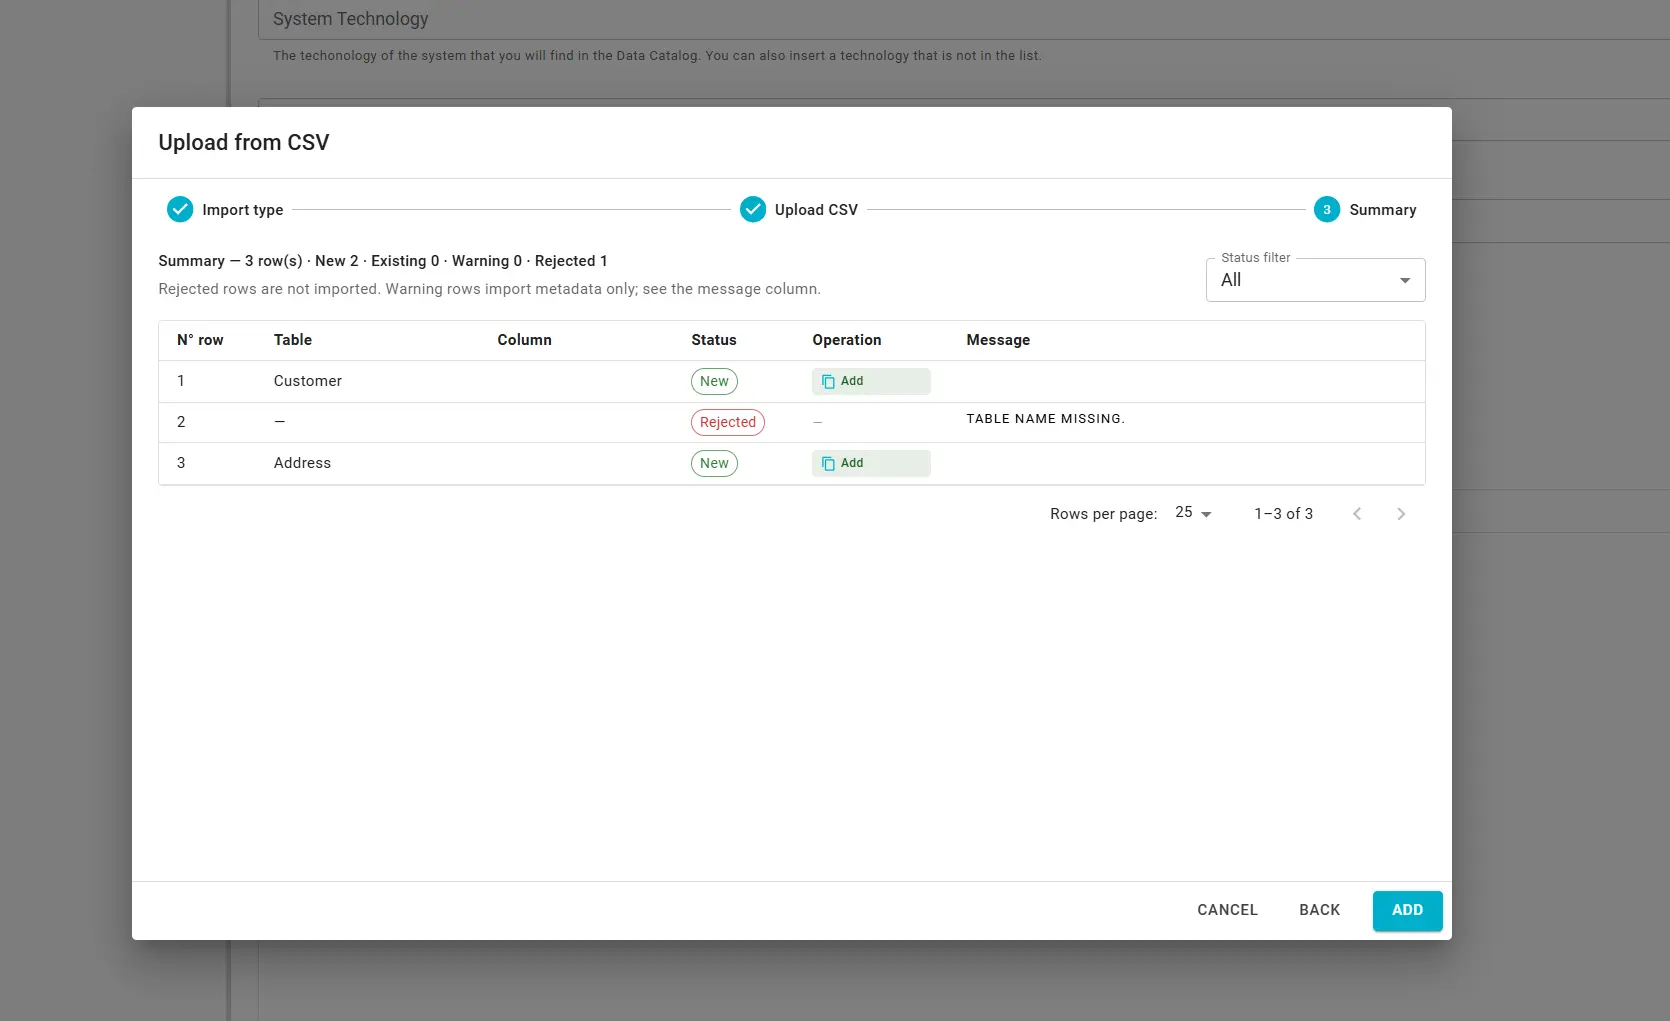
Step 3 — Summary
The summary grid shows one row per CSV record: table, column (in column mode), status, operation, and message when needed. Filter by status:
| Filter | Meaning |
|---|---|
| New | The table or column will be added. |
| Existing | The table or column in the descriptor will be updated. |
| Warning | Metadata is imported, but semantic linking or namespace alignment may be incomplete — check Message. |
| Rejected | The row is not imported. |
Operation is copy (merge new metadata) or overwrite (replace an existing table or column). Rejected rows are skipped. Warning rows are still imported; review messages for semantic link or namespace issues.
Click Add to apply the import to the in-memory descriptor, then SAVE DESCRIPTOR to push changes to the linked Git repository.
Semantic linking
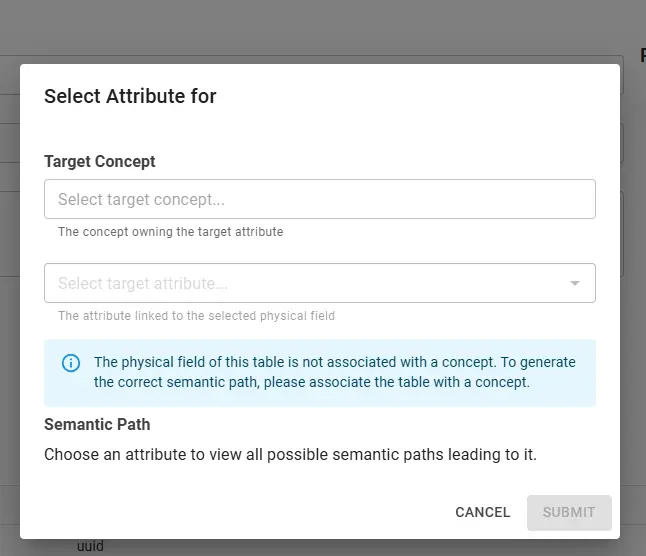
Physical fields and tables in the descriptor can be linked to concepts and attributes in the business glossary, so the data product’s structure is aligned with your semantic model. In the editor, use the control next to a table or field to choose the target concept and target attribute; the semantic path is then stored in the descriptor and available for discovery, lineage, and governance. If the table is not yet associated with a concept, the UI may prompt you to associate the table first.
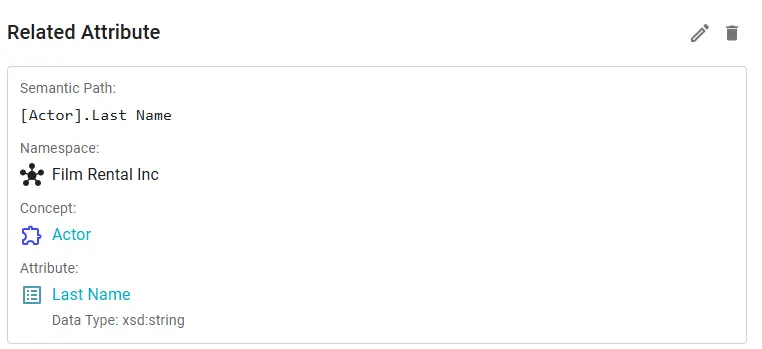
Once linked, the Related Attribute card shows the semantic path (e.g. [Concept].Attribute), namespace, concept, attribute name, and data type.
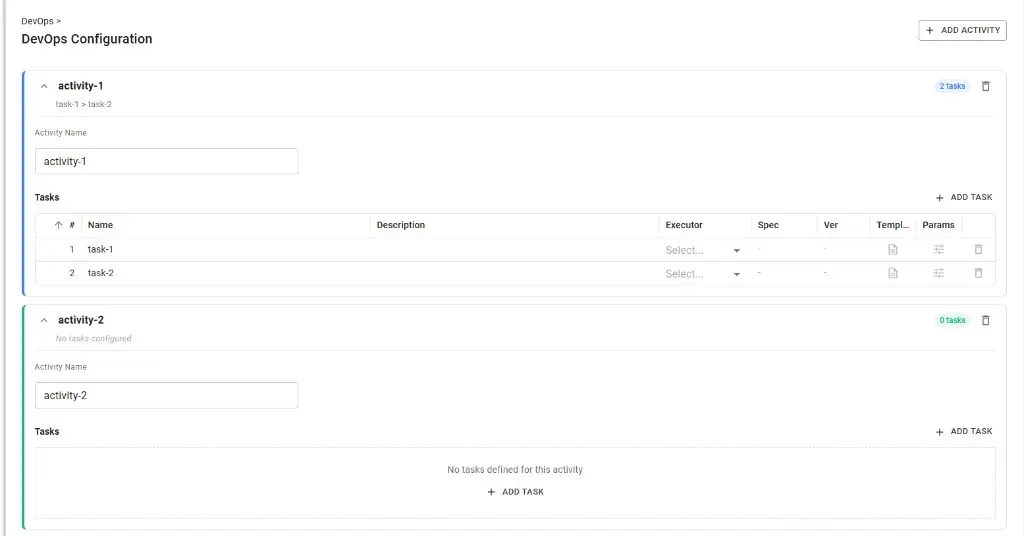
Lifecycle (DevOps) configuration
The lifecycle section of the descriptor defines activities and tasks that run across stages (e.g. dev, test, prod). You configure it in the Builder editor under DevOps: add activities with + ADD ACTIVITY, name them, then add tasks to each activity with + ADD TASK. For each task you can set name, description, executor, spec, version, template, and parameters. Tasks can be reordered with the up/down arrows; the order defines the execution sequence. The resulting structure is stored in the descriptor’s internalComponents.lifecycleInfo. Once saved and published as a version, these activities can be planned and run from the DevOps module.
For how stages are defined in the descriptor and how they drive deployment, see Data Product Lifecycle . For planning and running activities on a published version, see Manage Activities .
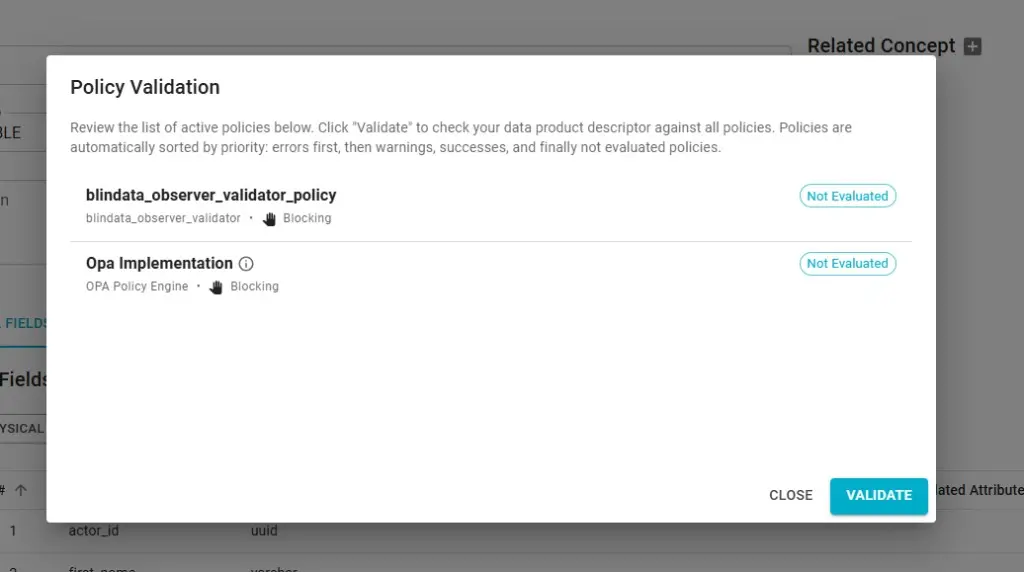
Policy validation
Before saving the descriptor, you can validate it against the descriptor policies (user-defined rules) configured in your tenant. In the editor, click VALIDATE POLICIES to open the policy validation dialog.
The dialog lists the active policies (e.g. validators such as OPA or custom observers). Each policy shows its name, type, whether it is blocking, and its evaluation status (e.g. Not Evaluated). Policies are ordered by priority (errors first, then warnings, successes, and unevaluated). Click VALIDATE to run the checks against the current descriptor. You can save the descriptor regardless of validation result; if validation fails or you skip it, you can still commit, and any policy errors will show up later (e.g. when publishing or when policies are evaluated).
For defining and deploying computational policies, see Computational Policies Management .